Summer Food

Zesty Lemon Bundt Cake
Earlier this summer I noticed an old bundt pan in a neighbor’s garage sale. I had never made a bundt cake and to be honest the whole idea never held much appeal. But as the days passed by and the old bundt pan was still sitting there looking forlorn and neglected my inclinations got the better of me. I went next door and rescued the bundt pan for 2 bucks. It did looked like it was probably left over from the ‘60’s when bundt cakes were all the rage. The interior was scarred and battered and dented here and there. A foreboding of what I might be in fore? A bakers’ worst nightmare? Maybe, but the pan had character and I was up for the challenge.
A little research was in order to find out just what propelled the bundt cake to the heights of popularity and baked in home kitchens across America in the 1960’s.
As it turned out the bundt cake’s origins are tied to the Eastern European kugelhopf. The bundt cake was however very much an American variation. It all came about when a group of Hadassah Society members in St Louis Park, Minneapolis, Minnesota longed to make the dense cakes with a hole in the center that they remembered from Easter Europe before the war. They enlisted David Dlaquist to design a baking pan to match their recollections. His company Nordic Ware then manufactured the cast aluminum bundt pans with a center chimney that made a hole in the center of the cake like those favored cakes from Germany and Poland.
The bundt cake pans didn’t take off at first, but when a bundt cake recipe was featured in Good Housekeeping magazine in 1963 some orders came pouring in. But it wasn’t until Ella Helrich won second prize for her “Tunnel Fudge Cake†recipe in the Pillsbury Bake Off in 1966 that put the bundt cake on the map. Sales soared with over 200,000 bundt cake pans sold across America.
Nordic Ware is still manufacturing various bundt pans as well as a huge selection of bake ware and baking supplies.
You can visit Nordic Ware’s website at www.nordicware.com
Needless to say, the Bundt Cake is now embedded into my baking vocabulary and as beat up as my garage sale bundt pan is, it is probably an original and I’m going to stick with it just as it is!

Zesty Lemon Bundt Cake
Required: 1 bundt pan very well greased to avoid problems when unmolding the baked cake.
I have done quite a bit of research about how to best insure that all your efforts are rewarded when you unmold your beautifully bronzed bundt cake intact and ready for glazing.
Firstly, Using a nonstick bunt pan in good condition will make unmolding the bundt cake that much easier.
Secondly, the best advice I have gleaned is, rather than brushing the interior of the bundt pan with melted butter, using vegetable shortening is a better choice for this application. Take your time and be meticulous about greasing every inch of the inner surface with great care. Then dust the interior lightly with flour, tapping excess flour out of the pan. Inspect the interior of the pan and grease any places you may have missed. This method has worked well for me, though a little tapping of the pan may be required once the cake is is turned over onto a plate. Do not panic. Be persistent and the cake will release.
Should anyone have another foolproof alternative for releasing a bundt cake from the pan I would love to hear from you!
For the cake:
- 3 cups all purpose flour
- 1 tsp baking powder
- ½ tsp baking soda
- ½ tsp salt
- 1 cup full fat buttermilk, or full fat Greek yogurt
- ¼ cup freshly squeezed lemon juice
- 1 tsp pure vanilla extract
- 1 cup (2 sticks) unsalted butter, softened
- 2 cups granulated sugar
- 4 eggs, lightly beaten
- 3 tablespoons lemon zest
Preheat the oven to 350 /f  180 / c
Combine the flour, baking powder, baking soda, and salt n a bowl and whisk until evenly combined.
In another bowl combine the buttermilk or Greek yogurt and the lemon juice and stir until smooth. Then stir in the vanilla and set the bowl aside.
Put the butter in a mixing bowl or the bowl of a stand mixer, and beat on medium speed until the butter is fluffy. Then add the sugar in three additions while continuing to beat until the mixture is light and fluffy.
Then add the eggs in three additions while you beat on medium sped until the mixture is smooth.
Lower the mixer speed to low and begin adding the dry ingredients and the buttermilk or Greek yogurt alternately. Continue until the batter is relatively smooth and evenly mixed. Then mix in the lemon zest until combined.
Spoon the batter into the prepared bunt pan and then gently shake the pan to even out the surface.
Place the cake in the center of the rack and bake for approximately 45 to 50 minutes.,rotating the cake after 25 minutes.
Test by inserting a toothpick or skewer into the center of the cake. If it comes out clean with a few crumbs the cake is done. If the cake requires more time return it to the oven for five minute intervals until it tests done.
Transfer the cake to a rack ans allow the cake to cool for 15 minutes.
Meanwhile you can make the glaze.
For the Glaze:
- 1 cup confectioners sugar , sifted
- 1 tablespoon freshly squeezed lemon juice
- 1 tablespoon whole milk
Put the lemon juice in a small nonreactive bowl and begin stirring in the confectioners sugar. Once the glaze starts to thicken you can add the milk while continuing to stir. Continue stirring while mixing in the remaining sugar until the glaze is smooth. If it seems a little runny put the glaze in the fridge and let it firm up a bit while you unmold the cake.
Once the cake is cool enough to handle, inspect the rim of the cake and remove any excess cake that may have spread over the edges of the cake pan. Then place a plate over the cake and, using both hands, invert the both together simultaneously . Let the cake settle over the plate for a minute or two.Then clamp the plate and the cake together using both hands and give it a good downward thrust…or two until you feel the cake release onto the plate.
If the cake does not release, tap the mold with the wooden handle of a knife over the surface of the mold and then repeat the downward thrust. If there is still no release place a steaming hot towel over the mold and repeat the downward thrust once again. Eventually the cake is going to relax and release so remain positive and be patient!
Serving:
Glaze the cake just before serving is ideal, although you may want to refrigerate the cake and the glaze for 15 or 20 minutes so the cake is cool enough to hold the glaze in place.
Take a moment to congratulate yourself and then serve your bundt cake with the satisfaction of being the seasoned baker that you are!
Collard Greens
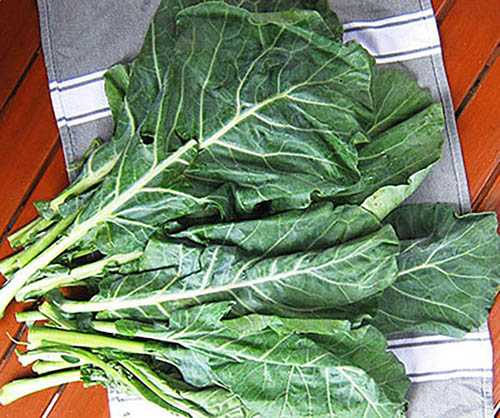
Collard Greens can stir up some animated conversations about an otherwise unassuming bunch of braised field greens. Lordy me! Seems you either love them or hate them, depending on which side of the Mason-Dixon line you happen to come from. That said, collard greens are real comfort food here in the American south. Their legacy reaches way back to native American diets before Europeans ever set foot here in the new world. Wild greens such as purslane, sorrel, poke, lamb’s quarters, dandelion, and chicory were all staples in the native American diet long before the loose leaf cultivars we call collard greens were planted in fields throughout the American south well before the civil war.
Collard Greens
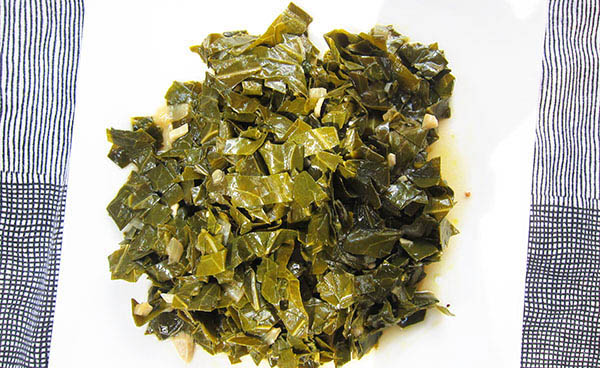
Traditionally collards are slow cooked with bacon fat and ham hocks, which are optional, along with some dried red chile flakes. The resulting braised deep green collards are swathed in a savory broth affectionately called “potlikker†here in the south.
Collard greens are in fact one of the most nutritious greens you could ever eat, They are rich in protein, vitamins, minerals, and antioxidants, as well as being low in calories. So whatever your preconceptions may be about collard greens, you owe it to yourself to give them another try. Simple to prepare and ideal fare throughout the growing season. The aroma of braising collards as well as their rich earthy green flavor is sure to win you over.
I prefer omitting the animal fats and meats when I braise collards , but if you are traditionalist by all means include them.
Collard Greens aka …a mess of greens with potlikker (Basics)
Unlocking the deep flavors of collard greens is very straight forward. The secret couldn’t be simpler. By following the wisdom of generations of southern cooks, you want to braise these cut greens at at a very low simmer while being mindful of the texture of the greens as they braise.
Ingredients:
- 2 ½ pounds collard greens, center ribs removed
- 3 tablespoons bacon fat (optional), or olive + more for finishing
- 1 small onion, chopped
- ½ to 1 teaspoon dried red chile flakes
- 2 oz ham hock or bacon, chopped (optional) ,or substitute 1 teaspoon smoked paprika
- 2 teaspoons salt
- 1 ¾ quarts stock or water
- freshly ground black pepper and salt to taste
- lemon wedges for serving
Needed:Â A large deep braising pan with lid.
Prepare the collard leaves before you begin cooking.
Using a sharp knife, cut out the center rib from the leaves lengthwise and discard them. Stack the leaves lengthwise and then roll them up lengthwise. Slice the rolled up leaves crosswise into ¾ inch slices. Then unfurl the slices and toss them together in a large bowl and set aside.
Place the braising pan on the stove top set at medium heat. When the pan is hot add the bacon fat or olive oil. When the fat is hot add the onions and saute for several minutes until the onions are softened and translucent. Then add the ham hocks or bacon if using, or the smoked paprika. Season with salt, and chile flakes, and stir to combine, and saute for a minute or so.
Add the stock or water to the pan, raise the heat, and cook until the broth is simmering.
Then add the sliced collards . Once the broth returns to a boil, reduce the heat so the broth is barely simmering. Partially cover the pan with the lid. Adjust the heat to maintain a very low simmer and braise until the collards are well cooked but still retaining a slight firmness. Cooking time will vary depending on the age and size of the collard leaves used, but somewhere between 45 minutes to 1 ½ hours.
Serving:
Serve the collards hot out of the pot along with some potlikker.
Taste and season with salt and pepper, and a spritz of olive oil and lemon juice.
Miso Wasabi Salad Dressing
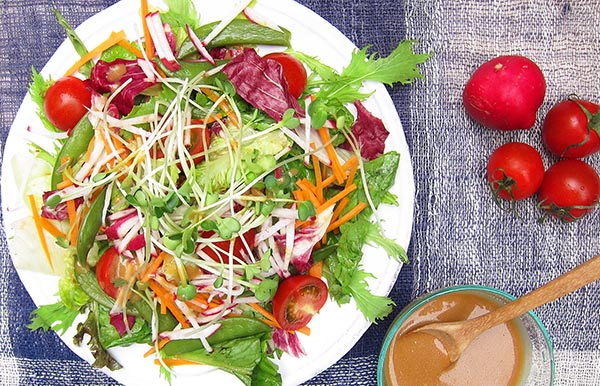
The Japanese ingredients say a lot about this zesty salad dressing, but it is surprisingly compatible when served with non-Japanese dishes as well.
As always, shop for the very freshest organic ingredients you can find. What I do love about this dressing is how the wasabi note heightens the crisp garden fresh flavor of the assorted salad components. Perfect for late summer and fall salads!
Miso Wasabi Salad Dressing   Makes 3/4 cup
- 3 tablespoons light miso
- 1 teaspoon finely grated garlic
- ¼ cup Japanese rice vinegar
- 2 teaspoons Tamari soy sauce, or regular soy sauce
- 1 teaspoon toasted sesame oil
- ¼ cup light vegetable oil, or light olive oil
- 1 or 2 teaspoons wasabi paste
- 3 tablespoons cold water
Combine all the ingredients except the water in a jar with a tight fitting lid. Shake vigorously until the dressing is completely emulsified. Add the cold water and shake once again until combined. Refrigerate the dressing until well chilled for serving.
Suggestions For the Salad
- romaine lettuce, leaves cut into thirds
- baby cos leaves, halved
- radicchio leaves, torn lengthwise
- iceberg, torn
- arugula (rocket) leaves
- celery leaves
- mizuna sprigs
- julienned carrots
- julienned radishs
- snap peas, blanched and chilled
- radish sprouts
- small vine ripe tomatoes, halved
- toasted sesame seeds (see recipe here)
Place the romaine, baby cos, radicchio, iceberg, arugula, and celery leaves in a large bowl and toss. Add a couple of teaspoons of dressing and toss to coat the leaves evenly.
Plating and Serving the Salad
Fan the mizuna leaves on chilled individual salad plates and mound a handful of tossed lightly dressed salad leaves onto each plate. Scatter the top of each salad with the julienned carrots and then the julienned radishes. Tuck the snap peas and halved tomatoes into the salads and lightly drizzle a little more dressing over each salad. Garnish with a flourish of toasted sesame seeds and serve.

Summer Mixed Berry Galette
August always reminds me of the beginning of berry season back in the American North East where I come from. Irresistible just picked fresh berries are on display in all the local farmers markets and at roadside farm stands that dot the countryside. A cooks delight to be sure!
What vividly comes to mind is making all sorts of summery mixed berry galettes. This French free form tart is so easy to make you will be find yourself whipping them up not only throughout the berry season, but into the winter months as well using frozen berries that you have put up in your freezer. I have to say, a warm galette coming out of the oven in the dead of winter brings back a taste of summer that is a pure delight that lifts the spirit.
Preparing a batch or two of your favorite flaky tart dough and freezing rounds gets most of the work for making a galette out of the way in advance. The berries require just a bit of sugar, a dash of lemon juice, and a little flour, that is then tossed together. The berries are then placed in the center of the rolled out dough and the edges of the dough are folded over the berries to create a rim. The galette is then baked for about forty minutes and…voila!
Keep in mind this idea works beautifully with any combination of mixed berries as well as berries combined with seasonal fruit as well.
I have included a recipe for a flaky tart dough from Elizabeth M. Prueitt’s TARTINE cookbook which has come to be my very favorite tart dough recipe. It is easy to handle and consistently delivers a perfectly light and flaky crust when baked.
Flaky Tart Dough  makes two 10 to 12 inch tart or pie shells (or double the recipe and freeze dough for later use)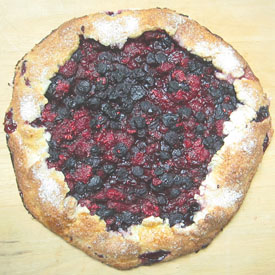
- 1 tsp salt
- 2/3 cup very cold water
- 3 cups + 2 tbsp all-purpose flour
- 10 ½ oz/300 g unsalted butter, very cold
In a small bowl combine the salt and water and stir to dissolve. Refrigerate so it is very cold when ready to use.
To make the dough in a food processor, put the flour in the work bowl. Cut the butter into 1-inch pieces and scatter the pieces over the flour. Pulse briefly until the mixture forms large crumbs and some of the butter is still the size of peas. Add the salted water mixture and pulse for several seconds until the dough begins to come together into a ball but not smooth. You should still be able to see some butter chunks.
On a lightly floured work surface divide the dough into two equal balls and shape each ball into a disk 1 inch thick. Wrap in plastic wrap and chill for at least 2 hours or preferably overnight.
Preheat the oven to 350 f /180 c with rack positioned in the center of the oven.
Line a large shallow baking tray with parchment paper.
Remove a round of well chilled dough from the refrigerator. Unwrap the dough and place on a lightly floured work surface. Let the dough soften for a couple of minutes before beginning to roll it out.
Then roll the dough out working from the center to the edges into a 12 or 13 inch round. Transfer the dough to the parchment lined baking tray and put it in the refrigerator to chill the dough while you prepare the berries.
Berry Filling   for 1 galette
As most berries are not grown here in the tropics I used imported blueberries and raspberries, and frozen lingonberries, but by all means use locally grown fresh berries when available.
- 2 cups fresh blueberries
- 2 cups fresh red raspberries
- 2 cups other fresh berries of choice
- 3 to 4 tablespoons granulated sugar or more to taste
- 1 teaspoon fresh lemon juice
- 2 tsp flour
- 1 egg yolk
- 1 tablespoon heavy cream or Greek yogurt
- granulated sugar for sprinkling
- 1 or 2 tsp corn starch mixed with cold water
Combine the all the berries in a large bowl and add the sugar and toss. Set aside for ten minutes and then drain off any excess juices and reserve to use later. If you are using frozen berries you will have considerably more juices to drain off and reserve. Taste the berries and add additional sugar if needed.Â
Once the juices have been drained off add the lemon juice and flour and toss to combine and set aside for a couple of minutes.
Give the berries a final toss and again pour off any excess juices into the bowl of reserved juices.
Gently mound the berries over the center of the dough leaving a generous 2 inches of border. Then fold the dough over the fruit around the edges creating a rim that will retain the juices while baking.
 Ideally there will be no leakage of juices, but to be honest that is usually not the case, but not to worry. The parchment will capture any leaked juices that will solidify on the parchment while baking. The parchment can be trimmed off later with a sharp knife before serving.
Mix the egg yolk with the cream (or Greek yogurt) and brush the dough overlapping fruit around the edges of the galette with the egg wash and generously sprinkle with sugar.
Transfer the galette to the oven and bake for 20 minutes. Then turn the baking tray 180 degrees and continue baking another 20 minutes or until the edges of the galette are nicely browned.
While the galette is baking place the reserved berry juices in a small sauce pan and bring to a simmer. Stir 1 or 2 teaspoons corn starch mixed with an equal amount of cold water and slowly stir into the simmering juices. Continue to stir until the juices thicken into a sauce. Taste the sauce and add sugar if needed. Transfer the berry sauce to a small pitcher and set aside to cool.
When the galette has finished baking remove it from the oven and place on a cooling rack. Once cool, trim the parchment paper around the galette and discard. You can then easily transfer the galette to a serving plate.
Serving
Slice the galette into wedges and place on individual dessert plates. As it is summer, vanilla ice cream is the perfect accompaniment, along with some of the berry sauce. Whipped cream is the alternative for fall and winter serving.

                 Bon appetite!