Meats

Mexican Chorizo Burrito
Mexican Chorizo Burritos have been on my mind the last few days as Cinco de Mayo celebrations are just around the corner. The 5th of May in Mexico celebrates the unexpected defeat of the French army in the battle of Puebla in 1862. While this was not the definitive ending of the French occupation of Mexico it marked the turning point for Mexico’s liberation from French rule.Â
As there is sometimes confusion about the differences between tacos and burritos, a short clarification follows. Both tacos and burritos us tortillas as a base. Tacos are generally made with 6 inch corn or wheat flour tortillas as a base. The tortillas can be either soft or fried and crispy. Tacos are served flat along with various salsas to add as condiments. Soft tacos are then folded and eaten using your hands. A burrito is best described as large 10 inch soft flour tortilla filled with various ingredients that are then wrapped and rolled into an open ended cylinder and eaten beginning at the open end. The burrito is the precursor of the contemporary“ wrap†if you will. Burritos are considered Mexican street food. Burrito is the diminutive word for burro. And so the burrito was aptly coined as a donkey loaded down with an assortment of ragtag cargo.Â
The Aztecs were making corn tortillas as far back as 10,000 BC, once they had devised a method called nixtamalization, in which native corn was soaked in water and lime which released vital nutrients in the corn. The corn was then boiled, dried, and ground into meal that was used to make corn tortillas. Tortillas were all made with corn until the Spanish arrived in Mexico in the mid 1500’s, and introduced and cultivated wheat that was integrated  into the Mexican diet via wheat flour tortillas which are used to this day as burrito wrappers.
Fast forwarding to twentieth century North America, where the fist commercially handmade tortillas were introduced in San Antonio, Texas, in 1947. Then In 1972 Villamex introduced the first machine made tortillas into the North American market and Mexican foods went mainstream.
The breakfast burrito, which includes fried chorizo and scrambled eggs, has become a favorite the world over. But the more common rustic chorizo burrito found all over Mexico that is filled with beans or rice, some Mexican cheese, and salsa is the real deal and pure perfection in my mind’s eye.
The Mexican chorizo burritto recipe that follows involves making several traditional components, but once they are prepared the burritos are easily assembled. Just think of the preperations as honing your Mexican cooking skills that you will be using again and again!
Mexican Chorizo Burritos   makes 6
Homemade Mexican chorizo For recipe (click here)
Follow the instructions for preparing the chorizo mixture and marinate it for at least 24 hours before you intend to use it.
Divide the chorizo mixture into 12 2 oz/57g portions. Shape each portion into small torpedo shaped sausages and place them on a parchment lined baking tray and refrigerate for 30 minutes. Any leftover chorizo mixture can be frozen for later use.
Preheat the oven to 375f/190c
Brush the Chorizo with olive oil and transfer the tray to the oven and bake for 25-30 minutes. Remove from the oven and set aside.

Homemade Chorizo for Burritos
Assembling the burritos:
- 6 large flour tortillas, wrapped in a kitchen towel and warmed in the oven or microwave
- soft cooked beans, or refried beans, warmed  For recipe (click here)
- For refried beans recipe  (lick here)
- Mexican cotija cheese (or mild Feta), crumbled
- 12 small warm cooked chorizos (2 per burritto), cut in half lengthwiseÂ
- sprigs of fresh cilantro leaves
- fire roasted tomato salsa  For recipe (click here)
Have all the components assembled before you begin making the burritos.
Making Mexican Chorizo Burritos
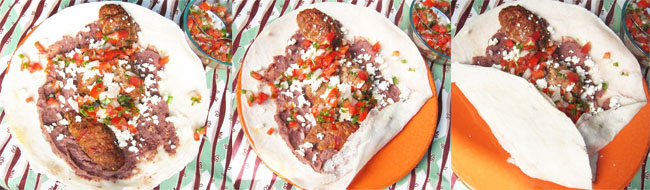
Place a warmed large flour tortilla on a large flat plate or cutting board.
Spread a generous amount of warm cook beans or refried beans over inner surface of the tortilla, leaving about an inch around the edge of the tortilla as it is.
Place 4 halves (from 2 sausages) on top of the beans in the center of the tortilla from top to bottom.
Scatter the crumbled cheese over the surface as pictured.
Spoon salsa around the center and topping the chorizo. Top with fresh cilantro sprigs to your liking.
Fold about ¾ of an inch of the bottom edge of the tortilla towards the top as pictured. Then fold the left side of the tortilla over the filling, gently tucking the inner edge of the tortilla under the filling as pictured.
Then gently roll the filled burrito until it meets the right side of the tortilla. Spread a small amount of beans near the edge to act as a “glue†before closing the burrito.
Serving:
Serve promptly while still warm with additional salsa on the table.
If you prefer making the burritos ahead of time, omit the salsa and the cilantro sprigs. Place the burritos on a backing tray and tent the tray with foil and secure the edges tightly. Place the tray in the preheated 300f/150c oven for about 20 minutes. Serve right from the oven with salsa and cilantro sprigs placed on the table.

KEFTA Moroccan Meatballs
I love Moroccan food for so many reasons, but above all it is how it reflects the exotic spirit of the country itself. Awash with vibrant colors, mind boggling souks, the sun bleached architecture of Tangiers, Marrakesh’s rich red earthiness, and sweeping landscapes stretching from the Atlantic eastward towards the Atlas mountains and southward to the edge of he Sahara desert are breathtaking. Likewise, eating your way through Morocco is a sensory journey through time and cultures that have influenced the very essence of the country and its cuisine. So whenever I am cooking Moroccan meals at home it is always like reliving all those exotic aromas and vivid flavors of Morocco all over again.
Kefta refers to the classic Moroccan dish of traditionally seasoned lamb meatballs simmered in a lemon infused broth as well as the meatballs themselves. Served with steamed couscous and a fiery harrisa sauce, this is a traditional Moroccan meal you will find yourself serving again and again. It is a real crowd pleaser!
I have taken a few liberties in the recipe that follows. I have made the kefta slightly larger than the traditionally smaller and denser size in pursuit of a more tender and juicy finish. I have also tempered the chile heat a bit, but this is a pretty fiery dish in Morocco so feel free to pull out all the stops. You won’t regret it I promise you.

Kefta with Couscous and Orange Radish Salad
Kefta; Moroccan Meatballs  serves 6
For the kefta:Â Â makes 24
- 1 lb/450 g ground lamb
- 8oz/ 225 g ground beef
- ½ cup dried bread crumbs
- ¼ cup milk or water
- 1 onion, grated (about 1 cup)
- 1/3 cup minced broad leaf parsley leaves
- 1/3 cup minced coriander leaves
- 1 egg, whisked
- 1 tsp dried mint
- ½ tsp dried marjoram
- 1 tsp ground roasted cumin seeds
- 2 tsp ras el hanout (click here for info and recipe)
- ¼ teaspoon cinnamon
- ½ tsp chile flakes (or more to taste)
- 2 tsp ground red chile powder (or ¼ to ½ teaspoon cayenne)
- 1 ½ teaspoons sea salt + more to taste
- 1/3 tsp freshly ground black pepper
- 1 cup chickpea flour (or all purpose flour)
- ¼ cup olive oil
For the broth:
- 1 tablespoon olive oil
- 1 tablespoons butter
- 1 large onion grated (about 1 ½ cups)
- 2 tbsp tomato paste
- 1 teaspoon ground ginger
- ½ tsp ground toasted cumin seeds
- ¼ tsp crushed saffron threads
- a pinch of turmeric
- 1 ½ tsp sea salt + to taste
- ¼ tsp freshly ground pepper
- 1 tsp sweet paprika
- 1 tsp red chile powder or to taste
- 1/3 cup minced broad leaf parsley
- 1/3 cup minced coriander leaves
- 3 whole dried red chile pods
- 2 garlic cloves, whole peeled
- 3 ½ cups water + more as needed
- zest and juice of 1 lemon
Place the ground lamb and ground beef in a mixing bowl and mix them together until combined.
In a small bowl combine the bread crumbs and milk (or water) and stir and set aside to soak for a few minutes. Then squeeze out the milk from the crumbs and scatter them over the meat mixture. Add the onions, parsley, and coriander.
Whisk the egg and pour over the meat mixture.
In a small bowl mix together the mint, marjoram, cumin, ras el hanout, cinnamon, chile flakes, chile powder (or cayenne), and salt and pepper and scatter over all. Then using both hands mix all the ingredients together until completely combined. Cover with cling film and refrigerate for at least1 hour or over night.
Once the kefta mixture is well chilled measure out 1 ½ oz/ 40 g portions and gently roll each portion into a round meatball/ kefta. Try not to overwork the meat when rolling the balls. This will ensure that the meat will be tender and juicy rather than dense and hard when cooked.
Place the flour in a shallow bowl and gently roll each kefta in the flour until evenly coated. Place them on a parchment lined tray, cover with cling film, and refrigerate for 1 hour. This will ensure the kefta will retain their shape when browning them.
Place a large non stick skillet over medium high heat and add the oil. Once the oil is hot add half of the kefta and brown them on all sides. Set the browned kefta aside while you brown the second batch and prepare the broth.
Select a pot that is large enough to hold all the kefta in a single layer. Place the pot over medium heat and add the olive oil and butter. Swirl the pan until the butter has melted and combined with the olive oil. Add the onions and saute until the onions are soft and translucent, about 5 minutes. Clear a well in the center of the pot and add the tomato paste. Press the paste against the bottom of the pan to caramelize it before stirring the onions and the paste together. Add the ginger, cumin, saffron, turmeric, salt, pepper, paprika, and red chile power. Stir the ingredients together until well combined. Then stir in the parsley and coriander and saute while stirring for a couple of minutes. Add the whole chile pods, garlic, and the water and stir. Once the broth is boiling, lower the heat to a rolling simmer and cook for 15 minutes.
Then gently lower the kefta into the broth using tongs. There should be enough liquid to nearly cover the kefta. If not stir in more water as needed. Once the both returns to a boil reduce the heat to a simmer and cook for 30 minutes without disturbing the kefta. Skim off fat and foam as it collects on the surface and discard. Just before you are ready to serve stir the lemon juice into the hot broth and taste for seasoning, adding more salt if needed. Remove the garlic cloves and discard.
Serving:
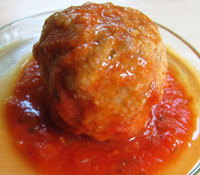
When you are ready to serve transfer the kefta to a serving bowl and add the broth and the whole chiles. Or, for individual servings, place 4 kefta per serving into shallow bowls or pasta plates along with broth, omitting the whole chiles.
Be sure to serve plenty of broth with the kefta. Garnish with lemon zest and serve with couscous, and an orange radish salad as pictured.Â

Harissa
Place a small bowl of harissa ( click here fore recipe)
on the table which can be dabbed on the kefta for extra spicy heat or stirred into the
broth.
The couscous with currants pictured is topped with fried precooked chickpeas and
toasted cumin seeds.

Meatballs….perfect (Basics)
Just a mention of meatballs and spaghetti is probably going to conjure up a flashback to one of those cafeteria lunch offerings we would all rather forget from our childhood. And of course most of us didn’t have an Italian Nona to cook for us, so we were left with the next best option, the ubiquitous Italian American restaurant versions of meatballs and spaghetti which were just often delicious enough to keep us coming back.Â
Fortunately, the true glories of meatballs have surfaced in nearly every culture and cuisine throughout the ages. From China’s Qin Dynasty, the Romans, the Persians, and of course the modern day Italian’s cuisine we are all familiar with today.
The recipe that follows does not stray far from the wisdom of the Italian Nona. My one exception is making the meatballs larger than the smaller traditional Italian “polpettesâ€. I much prefer the tender juiciness of these meatballs that are slowly simmered in a simple traditional “passata†tomato sauce. Serve them as they are or with pasta along with a beautiful crisp salad and you have a perfect pairing for simple meal for any season.
Meatballs (Basics)
Meatballs…(Basics)   makes twelve 2 ½ oz meatballs
- 1 pound/ 455 g best quality ground beef
- 1 pound/ 455 g lean ground porkÂ
- 2 thin slices pancetta, minced
- ½ cup dry breadcrumbs
- 3 tablespoons whole milk
- 1 ½ cups grated Parmigiano-Regiano
- 1 small onion, minced (about ¾ cup)
- 2 small garlic cloves, minced (about 1 tablespoon)
- ½ cup finely chopped Italian parsley leaves
- 1 extra large organic egg, whisked
- ¾ teaspoon freshly ground black pepper
- 1 teaspoon red pepper flakes (or more to taste)
- 1 ½ teaspoons flaked sea salt + more to taste
- 1 cup flour
- ¼ cup extra virgin olive oil
- Passata tomato sauce
- 3 bay leaves
In a large mixing bowl combine the ground beef, ground pork, and minced pancetta. Toss with your hands until well combined and set aside.
In a small mixing bowl combine the bread crumbs and milk. Set aside for 5 minutes and then squeeze out the excess milk.
In a medium bowl combine the milk soaked bread crumbs, 1 cup grated Parmegiano-Reggiano, minced onion, minced garlic, chopped parsley, whisked egg, ground pepper, pepper flakes, and sea salt. Toss the ingredients together until well combined. Then scatter the mixture over the ground meats and pancetta.
Using your hands, toss all the ingredients together until they are completely combined. Cover the mixture with cling film and refrigerate for 1 hour.
Once the chilled meatball mixture has firmed up, remove from the fridge, and weigh out 12 2 oz portions. Roll each portion gently between the palms of your hands until uniformly rounded. Do not over compress the mixture as you roll the meatballs. The less densely compacted they are the more tender and juicy they will be when cooked.
Gently roll each meatball in the flour until evenly coated. Shake off excess flour and place the meatballs on a tray. Cover the filled tray with cling film and refrigerate for 30 minutes. This will firm up the meatballs so they retain their shape while browning them.
Preheat the oven to 350 F/ 180 C
Remove the chilled meatballs from the fridge. Place the olive oil in a wide shallow braising pan or oven proof skillet set over medium heat. When the oil is nearly smoking add half of the meatballs to the pan and cook them until evenly browned on all sides. When done remove the meatballs and set them aside on a platter while you brown the remaining meatballs.
Once all the meatballs are browned, pour most of the oil out of the pan and remove any remaining bits left in the pan using a paper towel. The pan should look fairly clean. Add a bit more fresh oil if necessary.
Return the browned meatballs to the braising pan and pour the preheated “passata†tomato sauce into the pan until it nearly covers the meatballs leaving just the tops exposed. Tuck the bay leaves into the sauce and transfer the pan to the oven. The braising can also be done on the stove top if an oven is not an option.
After 30 minutes open the oven door, turn the pan, and add more sauce if needed. Return the pan to the oven for another 30 minutes. When finished the sauce should have thickened somewhat and the tops of the meatballs nicely glazed.
If you are serving the meatballs on a bed of pasta as pictured, have the pasta cooked al dente and ready for serving as soon as the meatballs come out of the oven.
Serving: Place the pasta on individual plates and top with 3 meatballs per serving. Spoon sauce over the pasta and a little over the meatballs. Top each meatball with the remaining grated Parmegiano-Reggiano and serve.
“Passata†Tomato Sauce:
- 2Â 24 oz bottles or cartons of Italian passata tomato sauce (Mutti brand is very good)
- 2 tablespoons extra virgin olive oil
- 1 ½ to 2 teaspoons sea salt
- freshly ground black pepper
- a pinch of sugar
- ½ teaspoon ground red chile (optional)
- chicken stock as needed
“Passata†describes a process where vine ripe Roma tomatoes are passed through a food mill and then cooked. The process removes the seeds and skin from the tomatoes and once cooked makes a simple tomato sauce with just a few added ingredients.
I highly recommend using imported passata. There are several brands available. Mutti is my favorite and makes a beautiful sauce bursting with flavor.
Place a large saucepan over medium heat. Add the olive oil and when nearly smoking pour in the passata and stir. Once the sauce comes back to a boil lower the heat to a simmer. Stir in the salt, black pepper, sugar, and chile powder if using. Cook for 30 minutes, stirring from time to time. Add hot chicken stock if the sauce needs thinning.
Keep the sauce warm on the stove top to add to the meatballs for braising or for saucing pasta before serving.
You will most likely have left over sauce which you can freeze for later use.
Jamaican Jerk Chicken
We’re already heading into the hottest months of the year here in Thailand and I can’t think of a better way to beat the heat than cooking up a fiery Jamaican Jerk. It’s hot, its ‘spicy, it’s smokin, and it’s a sure bet for breaking into a sweat that’s going to cool you right down Jamaica style!
I realize you all who live further north are still getting battered by some fierce late winter storms, but what better way to escape winter’s travails than chowing down on a seriously hot and lively Jamaican Jerk. Hold onto that thought! This is the kind of in your face spirited food that interjects a partying mood with every mind blowing bite anytime of the year!
Jerk refers to the local Jamaican cooking methods as well as the spice mixture, including locally grown allspice, that is used as a rub or marinade that seasons the chicken or pork before cooking. The allspice tree is an evergreen shrub that grows throughout the Greater Antilles, Southern Mexico, and Central America. The wood is used for cooking and smoking while the allspice berries (pimento) are dried, ground and combined with other spices for the Jamaican Jerk rub or marinade.
Jamaican jerk evolved using cooking methods brought to the island by enslaved Africans combined with indigenous Taino traditional pit roasting. Once metal barrels arrived on the island, vertical barrels were adapted for grilling and smoking the jerk simultaneously. Eventually barrel cookery was reinvented by splitting the barrel horizontally. The bottom half of the barrel is stoked with charcoal and fired up. The hot embers are then topped with allspice wood or sweet wood (laurel). The chicken or pork is then placed on top of the smoldering wood. The upper half of the barrel is then pulled down to create an intense chamber of aromatic smoke emitting from the red hot embers and smoldering wood. This combination of flavors and aromas is what makes Jamaican Jerk so unique and popular in Jerk joints on the island as well as in Jamaican enclaves in the US, Canada, the UK, and other Caribbean islands.
The other essential ingredient for any authentic Jamaican jerk is the island’s notoriously hot Scotch Bonnet chilies! These chilies have a distinct fruity flavor, but it is their 100,000 Scoville units of spicy heat that ranks them as the hottest chilies on the planet! But don’t let that scare you off. Risk is, after all, the very spice of life!
The recipe that follows is for Jamaican jerk chicken for the home cook. Obviously home cooks are not going to have a barrel cooker or maybe not even a grill for that matter. Not to worry! The oven method that follows will deliver an authentic mahogany colored Jamaican Jerk scented with allspice and sweet wood (bay laurel) that you will be proud to serve and a sure fire crowd-pleaser to use year round.
Jamaican Jerk Chicken   serves 4
Prepare the marinade mixture and marinate the chicken for at least 24 hours or up to 48 hours before roasting.
Scotch bonnet chilies will be hard to find unless you happen to live near a Jamaican enclave. If they are not available, Habanero chilies are very similar and available in Latino markets. Otherwise using a combination of hot Thai chilies will nicely replicate the flavor and heat of the Scotch Bonnet chilies.
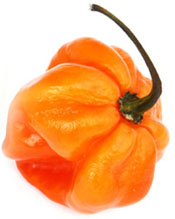
Scotch Bonnet Chile

Thai Yellow, Red, and Green Chilies
Chicken:
You can use a whole chicken with backbone removed, a chicken cut into pieces, legs and thighs only, or just skin on breasts. Breasts in particular, using this cooking method, are beautifully succulent and juicy.
For the marinade/rub:
- 2-4 Scotch Bonnet chilies or Habanero chilies, seeds removed and chopped
- Â If Scotch Bonnet or Habanero chilies are not available, use 2 yellow Thai chilies and 6-8 red and/ or green Thai chilies, seeds removed and chopped
- 6 scallions, trimmed and finely chopped
- 4 large garlic cloves, peeled and finely grated
- 1 inch knob of fresh ginger, peeled and finely grated
- 1 teaspoon dried crumbled thyme leaves
- 2 tablespoons ground allspice
- 1 teaspoon freshly grated nutmeg
- 1 teaspoon freshly ground black pepper
- ¼ teaspoon ground cinnamon
- 1 teaspoon finely ground bay leaves (ground in an electric spice mill)
- 3 tablespoons natural dark brown sugar
- 2 tablespoons cider vinegar
- 3 tablespoons freshly squeezed orange juice
- ¼ cup freshly squeezed lime juice
- 2 tablespoons dark rum
- 2 tablespoons light soy sauce
- 2 tablespoons olive or vegetable oil
- 1 teaspoon sea salt or to taste
Using a food processor or blender, combine the chilies, scallions, garlic, ginger, thyme, allspice, nutmeg, pepper, cinnamon, bay leaves, and brown sugar. Pulse until the mixture is well combined and nearly pureed.
In a small bowl whisk together the vinegar, orange juice, lime juice, rum, and soy sauce until well combined. With the food processor or blender running add the liquid mixture until well combined.
Then with the machine running add the oil in a slow steady stream until just incorporated.
Add the salt and pulse to mix. Taste and add more salt if needed.
Transfer the marinade to a non-reactive bowl or tray large enough to hold the chicken and set aside.
You can either poke holes into the chicken using a skewer or, if using breasts, slash the underside of the breasts with a very sharp knife on the diagonal. This will allow the marinade to penetrate deeply into the flesh.
Massage and press the chicken into the marinade until completely covered. Cover the dish with cling film and refrigerate for 24 to 48 hours.
For roasting:
Remove the marinated chicken from the refrigerator 30 minutes before you intend to roast.
Preheat the oven to 475 f/ 245 c
Select a deep roasting pan and a rack that will fit into the roasting pan snugly.
- ½ cup broken bay laurel leaves
- ¼ cup allspice berries or
- 2 tablespoons ground allspice
- ½ cup water
Scatter the bay leaves evenly over the bottom of the roasting pan. Top evenly with the allspice berries or ground allspice. Add the water to the pan and place the rack into the pan. Transfer to the preheating oven.
Once the oven is up to the required heat, remove the roasting pan from the oven. Shake off excess marinade from the chicken and place the chicken onto the hot rack skin side down. Promptly return the pan to the oven and roast for 15 minutes.
While the chicken is roasting, transfer the remaining marinade to a sauce pan and reduce until the marinade is the consistency of a paste. Remove from the heat and set aside.
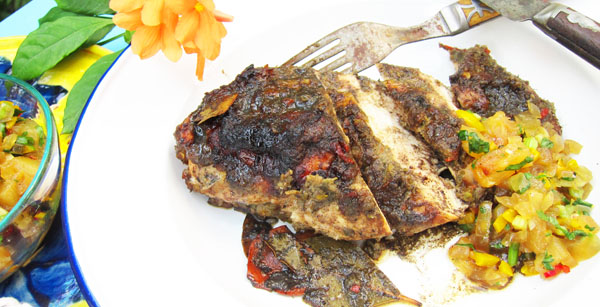
After 15 minutes remove the pan from the oven and turn the chicken over, skin side up. Baste generously and return the pan to the oven for 15 minutes. Then open the oven and baste the chicken once again. Turn the pan to ensure even roasting and roast for another 15 to 20 minutes. The chicken should have an almost mahogany charred color. Do not be concerned. The chicken has not burned, the brown sugar has merely darkened the marinade during roasting.
Remove from the oven, cover lightly with foil and rest for 5 minutes before serving.
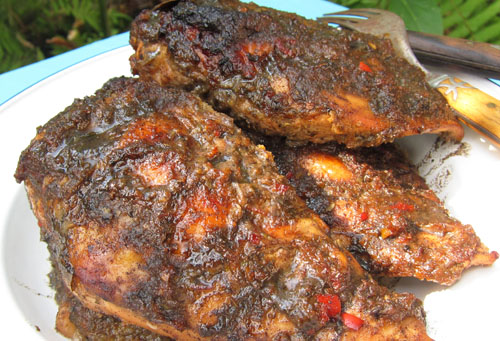
Jamaican Jerk Chicken
Serving:
Traditionally Jerk is served with rice and beans, and sometimes with a spicy fruit salsa as pictured. Be sure to spoon pan juices over the chicken before serving.
Any tropical fruit salsa laced with chilies adds a fresh sweetness to the sliced jerk chicken.