Sweets

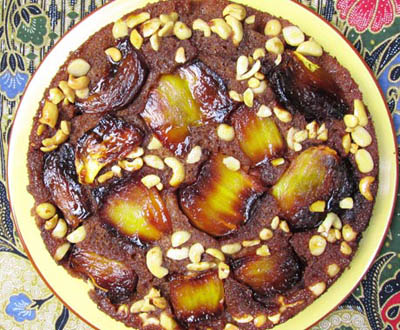
Tropical Ginger Cake with Jackfruit
Cakes are not a typical tropical dessert, but I couldn’t resist applying a little western influence using an old favorite upside down cake recipe as my guide.

Jackfruit
Likewise tropical fruits are not your typical western apples or pears. Here in South and Southeast Asia tropical fruits abound with colors, flavors, and aromas as assertive as they are exotic. Jackfruit is one of them that defies a comparison to any western fruit. The jackfruit grows on trees and can reach the size of a watermelon. The outer skin is a thick textured brilliant green. The interior reveals a moist yellow sectioned flesh with a mildly sweet taste something like pineapple and banana combined. Used for both sweet and savory dishes throughout Southeast Asia.
If jackfruit is not available where you live feel free to substitute another tropical fruit such as mango, pineapple, or bananas. Or, if all else fails, use apples, pears, peaches, plums, or apricots.
Tropical Ginger Cake with Jackfruit and Cashews serves 6-8
needed: 9-10 inch round baking dish or springform pan
Tropical Ginger Cake with Jackfruit
Preheat oven to 350F/180C , rack set in the middle of the oven
- 9 oz unsalted butter
- ¾ cup palm sugar (or light brown sugar)
- 1 cup whole milk
- 8 oz jackfriut sections
- ½ cup cashew pieces
- 1 ½ cups + 1 tablespoon all-purpose flour
- 2 ½ teaspoons baking powder
- ½ tablespoon ground ginger
- ½ teaspoon ground white pepper
- ¼ teaspoon sea salt
- 2 organic eggs
- 1 cup + 1 ½ teaspoons dark brown sugar
- 1 tablespoon dark rum
- 1 tablespoon freshly grated ginger
Rum syrup: - ½ cup granulated sugar
- 1/3 cup water
- 1/4 cup dark rum
- 1 teaspoon pure vanilla extract
Melt 4 ½ oz butter and palm sugar together over low heat, stirring until combined. Set aside.
Spread a thin layer of the butter palm sugar mixture evenly over the bottom of the baking pan. Arrange the jackfuit evenly in the bottom of the pan and scatter the cashews into the spaces between the jackfruit. Pour the remaining butter palm sugar mixture evenly over all. Set aside while you make the batter.
Melt the remaining 4 ½ oz butter and the milk together and stir to combine. Set aside to cool.
Sift the flour, baking powder, ground ginger, white pepper, and salt into a bowl.
Using an electric mixer fitted with a whisk attachment, beat the eggs and brown sugar together at medium until thickened, about 5 minutes.
Turn the mixer down to low and add the rum and grated ginger. Then begin adding the dry ingredients alternately with the butter and milk mixture in two additions. Mix until well combined.
Pour the batter over the jackfuit and cashews in the prepared baking pan.
Place in the oven and bake for about 35 minutes or until a knife comes out clean when inserted into the center of the cake.
Remove from the oven and run a knife around the edge of the baking pan. Wait about two minutes and then place a flat round platter over the baking pan (or over the cake if using a springform pan) and flip to release the cake onto the platter. Set aside to cool.
Making the rum syrup:
Place the sugar in a stainless steel sauce pan and add the water. Place the pan over medium heat until the mixture begins to boil. Lower the heat and boil without stirring until the sugar is dissolved. Continue boiling until large bubbles begin to form, the syrup has thickened and is a light amber color, about 6 to 8 minutes. Stir in the rum and vanilla extract. The syrup may freeze up momentarily. Simply Swirl the pan until the mixture smooths out. Set aside to cool. Rewarm when you are ready to serve.
Bring the cake to room temperature or warm slightly before serving.
Pour a small pool of the warmed rum syrup in the center of each individual serving plate. Place a slice of ginger cake centered over the syrup. Drizzle a little syrup over the top and serve.
Serving with ice cream or whipped cream is not something you would find in the tropics, but most appealing for westerners.

Passion Fruit Preserves
If there is any one food I am truly passionate about it is passion fruit! The passion flower is gorgeous, but the passion fruit itself is truly divine!
The deep purple Granadilla originated in southern Brazil, Paraguay, and northern Argentina, and is now grown all over the tropics worldwide and produces fruit nearly continuously throughout the year. The interior fruit, encased in a pink to white pulp, is bright orange flecked with tiny black seeds which are crunchy and edible. The flavor is both sweet and tart, with an intoxicating sweet tropical scent that defies description other than to say it is passionately seductive.
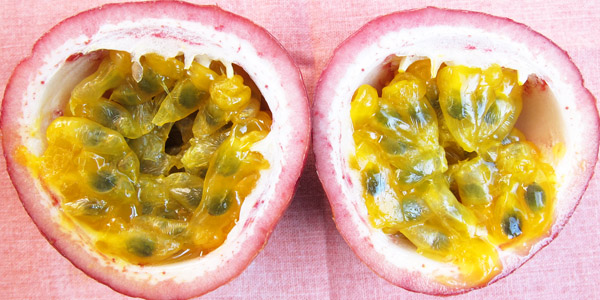
Passion Fruit
Rich in vitamins C, B, Niacin, Iron, Phosphorus, trace elements, and dietary fiber.
The recipe that follows is quite easy to prepare and I have to say it is the best preserve I have ever eaten…ever!
Buttered toast with passion fruit preserves is a breakfast revelation. But don’t stop there. Delicious paired with goat cheese on crostini for hors d’ oeuvre, as a glaze for grilled meats and poultry, and the ultimate pairing for pastries, tarts, and folded into pound cakes.
Not to be missed either is a passion fruit Pavlova topped with the passion fruit scooped right out of the casing onto the meringue. It is utterly sublime and couldn’t be easier. (see here)
Passion Fruit Preserves makes about 3 1/2 cups
Preserves, unlike jellies and jams, are less firm. The cooled liquid is just firm enough to suspend the fruit when cooled.
- 12 purple Granadilla Passion fruits
- 6 cups spring water
- 1/3 cup + 1 tablespoon freshly squeezed lemon juice
- 1 cup sugar per 1 cup measured boiled pulp; approximately 2 ½ cups
As this preserve is high in acid a simple method for storing is to prepare ahead several sterilized jars with sterilized lids. Once filled, cooled, and sealed, the preserves can be refrigerated for several months if the jars remain sealed.
For long term storage at room temperature a hot water bath canning method (see here) will be required.
Slice the fruit in half and spoon out orange pulp, juice and seeds in the center of each half into a non-reactive bowl and set aside to use later. There are quite a lot of seeds, so you may choose to remove up to half the seeds. Strain through a mesh strainer and discard unwanted seeds.
Place the emptied halved fruit with the pink and white rind intact into a large saucepan or stockpot. Add the water and lemon juice and set over medium flame. Bring to a boil, cover, lower the heat, and simmer for about 30 minutes, or until the rinds are a deep rosy pinkish color and are soft enough to remove from the outer purple skin with ease. Test as you go.
Once the rinds are very soft, drain using a colander set over a large bowl, reserving the cooking liquid to use later. Allow the halved fruit to cool in the colander until they can be handled easily.
Scoop the soft rind out of the skin and discard the skins. Slice the rind into thin strips about ½ inch in length. Measure the pulp and place in a large sauce pan. Add the appropriate amount of sugar as mentioned; 1 cup sugar to 1 cup pulp. Then add reserved cooking liquid to completely cover the contents with some to spare.
Place the pan over medium heat and stir until the sugar is dissolved without boiling. Once the sugar is dissolved bring the contents of the saucepan to a rapid boil without stirring. The rapid boil preserves the pectin which will  thicken the preserves when cooled. The cooking time could be up to 40 or 50 minutes. Watch the boiling and lower the heat slightly as the mixture reduces and thickens. Stir from time to time to avoiding scorching in the bottom of the pan.
Once the mixture is quite thick do a freezer test to be sure the liquid will set when cool. Drop a small amount of the cooked mixture onto a small plate and place it in the freezer to cool briefly. The liquid should firm up and wrinkle a bit when touched. If it has not firmed up, cook a little bit longer and do another test.
Once the boiled liquid is tested successfully, add the reserved passion fruit pulp, juice, and seeds, and cook while stirring continuously until the mixture is well combined and the mixture has returned to a boil. Remove from the heat promptly and set aside for 10 minutes. Then stir and pour the mixture into the prepared sterilized jars set on a cooling rack. Once the preserves have cooled to room temperature seal with sterilized lids.
Refrigerate for up to 3 weeks, although I have found the preserves remain stable for a month or two if they are not unsealed. These preserves are so good, they will be consumed in no time anyway! Wonderful topping for ice cream!
Tortoni
I first encountered Tortoni as a young boy, dining with my parents and their in town friends at a local Italian restaurant and watering hole called The Rose Bowl. It attracted a coterie of decidedly colorful locals and a regular horsey click that, to me, all seemed pretty “swanky and continental†for our otherwise staid colonial town in southeastern Pennsylvania. The place was mid-century modern before mid-century had a label. The lounge was decked out with Eames chairs, an open pizza station facing the entrance, a lively lounge to the left, and a dining area to right replete with amorphous banquets set under murals of Italian landscapes and Venetian canals. The original place was trending ever so briefly before it went through several ill conceived design updates and eventually sadly slipped into oblivion. But, never forgotten, it was one of those early encounters that indelibly shaped my ideas about food, art, design, and wanderings to far off ports unknown.
Tortoni’s popularity faded along with the mid-century, but for a few holdouts in New York’s Italian neighbourhoods. But its glory began long before in Paris at Giuseppe Tortoni’s Cafe de Paris at 22 Boulevard de Italians which opened 1798.

Manet sketching at Giuseppe Tontoni’s Cafe de Paris
Giuseppe Tortoni’s cafe and glacier became wildly fashionable, attracting artists, writers, diplomats, and cafe society alike, including Edouard Manet (see here), Honore de Balzac, Guy de Maupassant, and even America’s Thomas Jefferson who took Giuseppe’s recipe back home to Monticello to serve his Parisian discovery up for his duly impressed dinner guests. Tortoni caught on in America and continued to be served in the fanciest hotels and restaurants until the mid 60’s, then suddenly fell out o fashion with the arrival of the more decadent tiramisu and Italian gelatos.
Of course I knew nothing about tortoni’s notoriety as a boy, but tortoni, to me, was an exotic taste of of far off Italy; the almonds, spirits, and pistachios mirrored in the landscape murals over the banquettes at the Rose Bowl lingered. I was smitten!
My dear friend Marilyn kindly emailed me about her fond reminiscences of Tortoni from her early childhood in New York.
My absolute favorite memory was back in elementary school birthdays in the 50s with classes that included both Jewish and Italian kids. Â
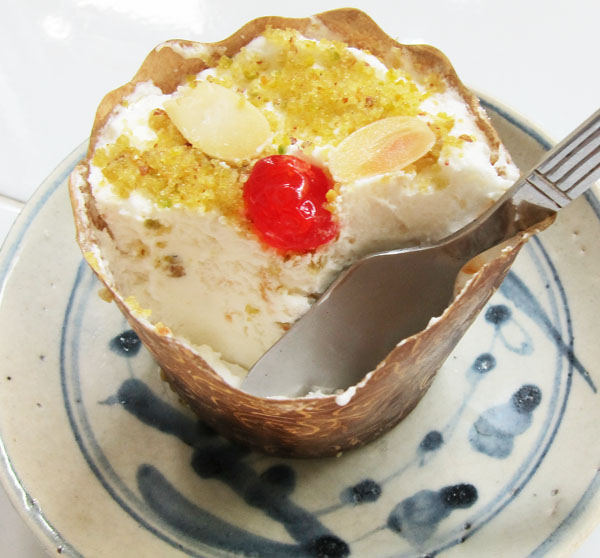
 The Italian parents always sent a big, flat cardboard box filled with tortoni – one for each of the students. The tortoni came frozen in short, white, folded cups – similar to the cups we used to get when we bought Italian ices - accompanied by little wooden spoons wrapped in paper. And they always had crumbled almond cookies on top and a bit of maraschino cherry in the center. To me, those creamy, frozen tortoni represented something so foreign and so exotic. It was like another world – the nectar of the gods. I’ve always wondered how something so delicious could have disappeared from Italian menus – especially in Brooklyn, NY. But I guess great desserts were replaced by craft beer.  Even Viniero’s (on 1st Avenue and 12th Street in Manhattan) - where one could still get the creamiest Italian chocolate ices – closed last year.Â
The recipe that follows is drawn from my own recollections of that first encounter with Tortoni. A frozen fluffy creamy Italian delight set in a pristine white pleated cup topped with crumbled crunchy almonds and pistachios and a bright red cherry in the center.

Tortoni
Tortoni   makes 12
Needed: 12 paper muffin cups and  1 muffin tray
- 3/4 cup blanched sliced almonds, lightly toasted
- ¼ cup water
- ¾ cup granulated sugar
- 3 egg whites, chilled
- ¼ teaspoon cream of tartar Â
- 1 1/2 cups heavy whipping cream
- 1/2 cup confectioner’s sugar
- ½ teaspoon almond extract
- ½ teaspoon pure vanilla extract
- 2 teaspoon dark rum
- 1/4 cup whole milk
- 12 small maraschino cherries (or 6 large, halved), or candied cherries
Place the muffin tray in the freezer while you prepare the tortoni.
Preheat the oven to 350F/180C
Toast the almonds in a baking tray for 8 to 10 minutes until lightly browned. Remove from the oven and transfer the almonds to another tray to cool. Reserve 48 perfect almond slices to use for adding to the top of the tortoni. Blitz the remaining almonds and ¼ teaspoon almond extract into a fine meal, but with some texture, and set aside to use later.
Place the sugar and water in a small stainless saucepan and bring to a boil without stirring. Using a candy thermometer continue boiling the mixture until it reaches 242F/116C. Remove from the flame promptly and set aside.
Add the chilled egg whites to an electric mixer bowl and add the cream of tartar. Beat until the whites form soft peaks and then begin adding the hot sugar syrup to the egg whites, while still beating, in a slow steady stream until the whites form stiff peaks, about 3 or 4 minutes. Transfer to a bowl, cover, and refrigerate for 30 minutes.
Whip the cream in an electric mixer bowl, adding the confectioner’s sugar and the remaining ¼ teaspoon almond extract and vanilla once the cream begins to thicken. Then add the rum and continue to whip just until the whipped cream forms soft peaks. Do not over whip the cream so that it folds into the egg white mixture evenly without clumping.
Remove the bowl of whipped cream from the mixer and fold the chilled egg white mixture into the whipped cream by hand until completely incorporated. Fold in ½ cup of the blitzed toasted almonds evenly.
Place the bowl in the freezer and chill for 30 minutes. Remove the bowl from the freezer and whip the contents. Return the bowl to the freezer for another 30 minutes. Again remove the bowl from the freezer and begin to whip the contents while adding the whole milk. continue to whip until incorporated. Return to the freezer for another 30 to 40 minutes until firm.
Remove the muffin tray from the freezer and fill tray with paper muffin cups. Then remove the bowl or tortoni from the freezer and whip briefly. Spoon the tortoni mixture into the paper cups compressing the mixture to fill the paper cup evenly. Transfer to the freezer, uncovered, while you make the almond pistachio crumb topping.
For the almond pistachio crumb topping:
- 1/2 cup shelled blitzed roasted pistachios
- 1/4 cup blitzed toasted almonds
- 7 tablespoons granulated sugar
- 2 drops almond extract
- 1 ½ teaspoons water
Place all the ingredients in a bowl and mix together, using the back of the spoon to crush the ingredients together into a slightly moist sticky crumb.
Remove the tortoni from the refrigerator and top each cup with the pistachio almond crumb. Be a little generous here as the crunch of the crumb brings the tortoni to life. Arrange 4 toasted almond slices on each tortoni and place a cherry in the center of each.
Return to the freezer, uncovered, until the tortoni is set and then cover with cling film and freeze for at least 6 hours before serving.
Once set the tortoni can be transferred to a covered container for long term storage in the freezer.

Speculaas & Sand Tarts
What better time to revisit old family recipes to rekindle the spirit of Holiday gatherings, cooking together, and celebrating with all things good coming out of your kitchen!
First on the list of must haves for holiday celebrations are cookies!
Prepared in advance and carefully stashed away in cookie tins frees up time on the big day when  all your well made plans and orchestrated preparations  miraculously materialize on the table for all to savor and celebrate with good cheer.
Speculaas (see here) and Sand Tarts (see here) are two of my favorite holiday cookies. Enlists some helping hands and everyone will have fun on baking day, I promise.
Happy Holidays… from my kitchen table to yours!