Sweets
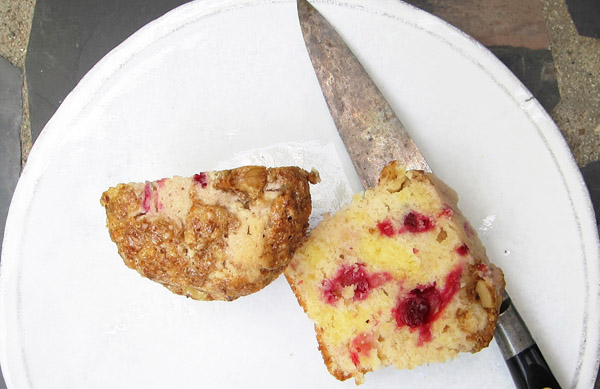
Lingonberry Muffin
Entertaining
These bright zesty muffins are loaded with lingonberries, accented with orange, and topped with an icy walnut glaze that is sure to delight everyone at your breakfast table, with coffee mid-day, or at tea time.
This recipe was adapted from Nancy Silverton’s Cranberry-Almond Tea Bread ; Pastries from the La Brea Bakery, which, as I have mentioned before, is the must have cookbook for anyone who loves to bake!
Lingonberry Muffins; makes 8 Â Â Â Â Needed: a muffin baking tray and paper muffin cups

Lingonberries
- 6 ½ oz/190gr/1½ sticks unsalted butter, chilled
- ½ teaspoon baking soda
- zest of 1 lemon
- 1 tablespoon orange zest
- 1¾ cup granulated sugar
- 2 extra large egg yolks
- 1 teaspoon orange extract
- 1 tablespoon freshly squeezed lemon juice
- 1 ½ cups unbleached pastry flour
- ½ cup Greek yogurt
- 2 extra large egg whites
- 1 cup fresh or frozen lingonberries
Topping:
- 1 extra large egg white
- 2 tablespoons granulated sugar
- ¾ cup of chopped walnuts
Cut the chilled butter into cubes and place in the bowl of an electric mixer fitted with the paddle attachment. Add the baking soda, lemon zest. and orange zest. Mix on low for a couple of minutes until softened. Add half of the sugar and continue to mix at medium speed until light and fluffy, scraping down the sides of the bowl and the paddle as needed. Add the egg yolks one at a time until mixed in. Add the orange extract and lemon juice and mix until combined.
Add the flour and yogurt in several additions and mix until combined. The batter will be very stiff, but not to worry! Transfer the batter to a large mixing bowl and set aside while you whisk the egg whites.
Preheat the oven to 350F/180C
Wash the mixer bowl, removing all traces of butter fat. Dry the bowl and return it to the mixer fitted with the whisk attachment. If you have a hand held mixer, which is handy in this kind of situation, by all means use it and do the washing up once the muffins are in the oven. Whisk the egg whites, beginning on low and increasing the speed to medium-high once the egg whites are frothy, continuing to whisk until the egg whites peak. Turn the mixer to high and add the remaining sugar in several additions until the egg whites are glossy and stiff.
By hand, fold ½ cup of the whisked egg whites into the batter to loosen it up a bit before continuing to fold in the remaining egg whites in several additions. Take your time, being sure the egg whites are well folded in before adding more. The batter will look somewhat lumpy, but that’s fine. Add the lingonberries and fold in evenly.
Preparing the topping and baking:
Whisk the egg whites by hand until quite frothy. Stir in the sugar and add the chopped walnuts and mix until well combined.
Spoon the batter into paper baking cups, set in a muffin baking tray, to about ¾ full. Smooth the batter in each cup and spoon the topping mixture into each cup.
Transfer the baking tray to the oven and bake about 25 to 30 minutes. Test by inserting a thin skewer into the center of a muffin. If it comes out clean the muffins are done. Allow the muffins to cool about 5 minutes and then remove the muffins from the baking tray to a cooling rack.
Serve warm or cool completely before storing in an airtight container, or refrigerating, or freezing.
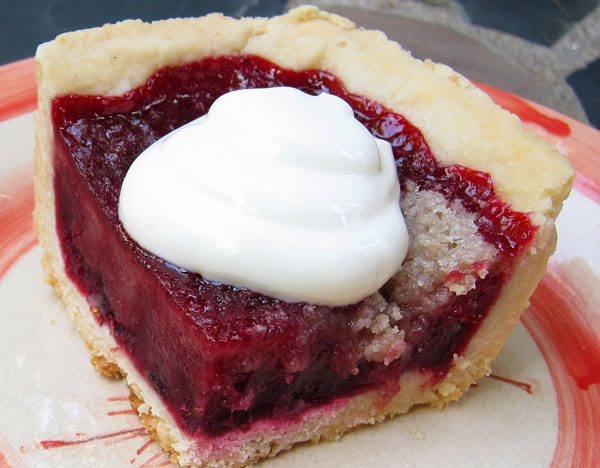
Lingonberry Tart
Entertaining
The holidays have come and gone, but I discovered a cache of frozen Lingonberries at my local specialty foods market while shopping for the holidays, in Thailand of all places, and decided to freeze loads of them with the hope that they will last until next year’s crop arrives. They are absolutely delicious and adapt to so many applications. I just can’t get enough of them!
Lingonberries, in the cranberry family, are much smaller with a more intense flavor and deeper red color than the larger commercial cranberries we are all familiar with. Lingonberries are loaded with nutrients, antioxidants, and are even purported to slow down the aging process! If that isn’t enough to send you running out in search of these deliciously tart red bundles of metabolism boosters perhaps their addictive spike to salad dressings, sauces, jams, soups, or even stews will convince you otherwise.
Lingonberries grow on low evergreen like shrubs, rather than in bogs, and are widely picked on the heaths in Scandinavia in the fall and early winter months and preserved, or frozen, for use throughout the rest of the year. They are also native to the north eastern Canadian coast as well as the Pacific North West. So they are available! I wholeheartedly urge you to seek them out. Additional recipes will follow this post to make the case for these brilliant red gems from nature as an essential part of your cooking adventures over the winter months and on into the summer.
Lingonberry Tart: Serves 8
Sweet pastry dough (using your preferred recipe)
Roll out the pastry dough and transfer it to a tart pan or rectangular cake pan and chill until ready to assemble the tart.
For the berry filling:
- ½ cup water
- ¾ cup granulated sugar
- 1 cinnamon stick
- 2 cups fresh or frozen Lingonberries (or cranberries if not available)
- ¾ cup freshly squeezed orange juice
- 1 tablespoon corn starch + 1 tablespoon cold water
Place the water and sugar in a large deep sauce pan and add the cinnamon stick. Place over medium-high heat and bring to a boil without stirring and continue to cook until the sugar is melted and the liquid is beginning to color; about 4-5 minutes. Then, begin to swirl the pan over the flame and continue to cook until the sugar syrup is a medium caramel color; about 5-8 minutes. Be careful not to overcook the caramel syrup as it tends to become bitter.
Remove the pan from the heat and add the Lingonberries and orange juice which will splatter a bit and seize up in the sugar syrup. Return the pan to the stove over medium heat and cook until the seized sugar has melted back into the syrup. Place a strainer over a bowl and strain the syrup into the bowl. Set the berries aside and pour the syrup back into the sauce pan and bring to a low boil. Stir in the cornstarch water mixture and stir continuously while bringing the mixture back up to a boil and  cook for 3 minutes until the sauce thickens. Remove the pan from the heat and add the berries to the thickened syrup. Return to the heat and simmer for a couple of minutes to combine. Remove the pan from the stove, remove the cinnamon stick, and set the pan aside to cool for 15-20 minutes.
The above procedure is the basic preparation used for many other Lingonberry recipe applications, so you might want to keep it handy, omitting the cinnamon stick and cornstarch for some savory recipes.
Preheat the oven to 350F/180CÂ with the rack set in the middle of the oven.
For the topping:
- ¾ cup pastry flour
- ¾ cup granulated sugar
- ½ teaspoon ground cinnamon
- 6oz/175 grams (1 ½ sticks) unsalted butter, cut into small cubes and well chilled
- 1 small organic egg, lightly beaten
- Greek yogurt for serving
In a food processor combine the flour, sugar, and ground cinnamon and pulse until well mixed. Add the chilled butter cubes and pulse until the mixture resembles a course meal. Add the beaten egg and pulse just until the egg is incorporated.
Remove the prepared pasty in the baking pan from the fridge and pour in the lingonberry mixture. Scatter the crumb topping evenly over the surface of the tart and place in the oven. Bake for about 45 minutes, or until the berry syrup is bubbling up around the edges of the tart and the topping is lightly browned. Remove the tart from the oven and set on top of a cooling rack until cool.
Serve the tart at room temperature with a dollop of room temperature Greek yogurt for each serving.
Â

Sand Tart Cookies
tis the season…Holiday Cooking
Sand Tarts are an old and very traditional Lancaster County Pennsylvania Christmas cookie. European in origin, family recipes brought to the colonies and handed down from generation to generation and cherished as a very special holiday delight. Tins full of Sand Tarts were made weeks in advance of the holidays in the house where I grew up and everyone gathered in the kitchen to help with the baking.
Simple butter cookie dough is rolled out paper thin, cut with handed down family cookie cutters, and baked into feathery light sand colored Christmas tarts dotted with nuts and dusted with cinnamon sugar. The secret to success is amply chilling the dough and, of course, quickly rolling the dough out until nearly transparent. This takes some practice, but well worth the effort. Once you’ve got the technique in hand it’s almost like riding a bicycle when the next Holiday season rolls around.
Sand Tarts: makes 70 to 85 cookies
- 1/2 cup/ 4 oz farm fresh unsalted butter, at room temperature
- 1 cup super fine sugar
- 1/2 teaspoon pure vanilla extract
- 1 large organic egg, well beaten
- 1 3/4 cups/8 ½ oz pastry flour, twice sifted
- 1 teaspoon baking powder
- 1 good pinch fine sea salt
For topping:
- 2 egg whites well beaten
- 1/2 cup coarsely broken nuts; walnuts, pecans, or almonds
- 1 tablespoon super fine sugar
- 1 tablespoon fresh ground cinnamon Â
- 1/4 teaspoon freshly grated nutmeg Â
Combine the sugar, cinnamon, and nutmeg and set aside for dusting the cookies before baking.
Cream the butter and sugar together by hand in a large mixing bowl until fluffy. Add the vanilla and the beaten egg and whip everything together until well combined.
In a separate bowl twice sift the flour, baking powder, and salt together.
Begin adding quarter cups of the sifted ingredients to the butter mixture and mix in by hand until combined. As you add the sifted ingredients the dough will begin to come together and once all added the dough should easily pull away from the sides of the mixing bowl and bind together. At this point use your hands to form the dough into a ball.
Remove the dough from the bowl and place on a work surface. Divide the dough into three equal pieces and place on large squares of plastic film. Flatten the dough into discs about 1/4 inch in thickness. Wrap the film around the dough tightly and place the dough in the fridge and chill for at least twelve hours or overnight!
Remove a round of the dough from the fridge and roll out on a very lightly flour dusted pastry cloth or silicone pasty mat. Work as quickly as you can and roll the dough as thinly as possible. When you begin to see through the dough you are nearly there.
Unless you are working in a very cool kitchen I would suggest re-refrigerating the rolled out dough on the mat until it is firm for cutting out the cookies.
Continue rolling out the remaining dough and chilling before you begin cutting out cookies.
Preheat the oven to 325F/165C Place an oven thermometer in the oven. Have several baking sheets ready and lined with parchment or Silpot mat.

Enlisting some willing helpers for the cutting, baking, and cooling will make the baking go much more smoothly…and it’s fun for all!
Remove a mat of chilled rolled out dough from the refrigerator and begin cutting out the cookies with as little waste as possible between each cut cookie. Remove scraps of dough around the cookies and carefully lift the cut cookies onto a baking sheet. Reserve the scraps and set aside, combining all scraps for a final rolling out of dough, although the re-rolled dough will not be as fine, but worth doing as motivation for your busy helpers!
Brush the tops of the cookies with the egg whites and stick broken nuts in the center of each cookie followed by a dusting of cinnamon nutmeg sugar.
Check the oven temperature on the oven thermometer before baking! Temperature and timing are of the essence for these delicate cookies!
Pop the cookies in the oven and bake for 6-8 minutes. The cookies should only faintly begin to color when done. Remove from the oven and rest on the tray for a minute or two to allow the cookie to firm up a little bit before transferring the cookies to a cooling rack.
Once the cookies are completely cool you can transfer them to tins or other air tight containers. The cookies will remain fresh for several weeks kept in a cool place, without refrigeration!
Â
Â

Speculaas
tis the season…Holiday cooking!
Spicy Speculaas are traditional Dutch koekjes (cookies) baked for St. Nichola’s Feast day…or Sinterklaas, on December 5th, although they are so popular they are gladly now available year round at specialty food shops.
A richly spiced shortbread dough, a throwback to the Dutch spice trade of the 18th century in Indonesia and the Spice Islands of Maluku, Â is traditionally pressed into hand carved wooden molds representing favored characters of Dutch folk lore, released onto baking trays and baked into rustic,dark, crispy, and fanciful aromatic koekjes. The aroma alone filling the kitchen every time I bake them brings back such fond memories of Speculaas from my years spent in Holland. I do urge to try them! Speculaas will surely become a favorite to add to your holiday baking repertoire and, for that matter, for baking them year round.Â
If you happen to have Speculaas molds, by all means use them. That said, using molds is a tedious proposition, but I have included notes at the end of this post for instructions.Â
The recipe that follows is for cutting the dough from a loaf or rolling out the dough and using cookie cutters instead of the traditional molds works splendidly.
Speculaas Spice Mix Makes more than you need for this recipe, but stores well for future baking.Â
- 3 tablespoons ground cinnamon
- 4 teaspoons ground clove
- 4 teaspoons ground nutmeg
- 2 teaspoons ground white pepper
- 2 teaspoons ground anise seed
- 1 teaspoon ground ginger
- ¾ teaspoon ground cardamom
Combine the ingredients and store in an airtight jar.
Speculaas dough recipe
- 1 ½ cups + 1 tablespoon pastry or all purpose flour
- 2 teaspoons baking powder
- ½ teaspoon baking soda
- 3 teaspoons speculaas spice mix
- ¼ teaspoon salt or to taste
- 8 tablespoons / 4 oz. unsalted butter at room temperature
- 2/3 cup soft brown sugar
- 2 tablespoons buttermilk or whole milk Â
- ½ cup slivered almonds, lightly toasted and chopped
- 1 egg, beaten, for wash Â
- 2 tablespoons toasted almond slivers, whole for decorating
- sugar + cinnamon mixture for lightly dusting
Sift the flour, baking powder, baking soda, spice mix, and salt together in a bowl.
In another bowl combine the butter and brown sugar and whip together until fluffy. Add the buttermilk or milk and whip until smooth.
Begin mixing in by hand the sifted ingredients and chopped toasted almonds into the butter mixture alternately. The dough will gradually come together and release from the sides of the bowl. Work the dough into a ball once all the flour and almonds have been incorporated.
Remove the dough from the bowl and form into an even ball,  flattening it out if you plan to roll it out for cut cookies. Wrap in plastic film and refrigerate for several hours or overnight.
If you prefer slicing the cookies as I have done here, place a piece of parchment on your work surface. Place the dough on top and begin to wedge the dough into a rectangular loaf about  8 inches in long, 4 inches wide, and 1 1/2 inches thick. Use a dough scraper to even up the sides and ends of the loaf. Place another piece of parchment on the top surface of the loaf and flip over and gently pat any uneven surfaces into a uniform loaf. Wrap the loaf in cling film and refrigerate overnight.
Preheat oven to 330F/165C
 If you  intend to roll the dough out for cutting with cookie cutters, allow to rest a few minutes and then begin to roll out the dough to about 3/8 inch/1/2 cm thickness. Cut the cookies and place on baking sheets, lined with parchment or a Silpot non-stick baking mat, highly recommended for trouble free cookie baking) with a little space between each cookie.
For slicing cookies from the loaf, simply slice across the loaf to about 3/8 inch thickness. Place on baking sheets lined with parchment or Silpot with a little space between each cookie.
Brush the centers of the cookies lightly with egg wash and stick several slivered almond slices onto the center. Dust with the cinnamon sugar mixture and transfer the baking sheet to the oven. Bake for about 15 to 18 minutes, being careful not to overcook.
Remove the baking trays from the oven and set aside for several minutes to cool before removing the cookies to a cooling rack to cool completely.
When the Speculaas are completely cool, transfer to an airtight container and store for up to several weeks.
Note for using traditional wooden molds:
Remove the dough from the refrigerator and dust the Speculaas molds with rice flour and press dough into the mold. Trim excess dough around the edges of the mold and carefully lift the Specullaas  out of the mold, turn over in the palm of your hand, brush off any excess rice flour, and place on a baking tray lined with parchment or Silpat.Â
 If