Sweets
Santa Fe Biscochitos
From my kitchen to yours…
wishing One and All the Merriest of Holidays
and a Splendid New Year of cooking adventures!
There’s nothing like Christmas in Santa Fe! With the mountains blanketed in snow, the crisp winter evenings scented with pinon and sage, flickering farolitos lining the winding roads, and the aromas of New Mexico’s world famous red and green chile cuisine that makes Santa Fe a destination like non other for celebrating the holidays.
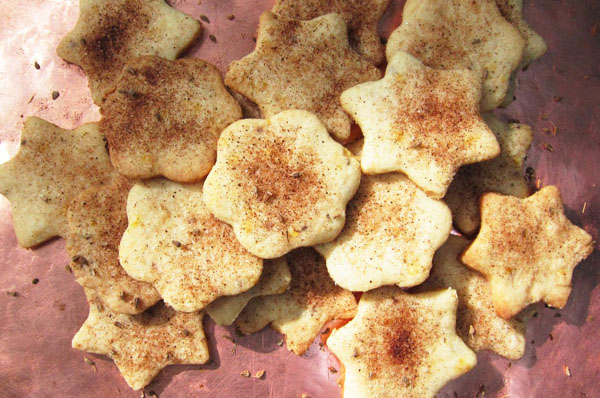
Anise and cinnamon scented Biscochitos are synonymous with holiday celebrations throughout New Mexico. Origins date back to the Spanish colonists in Mexico who ventured northward and settled in the Sangre de Christo mountains of what was then called Santa Fe de Nuevo Mexico.
Biscochitos are very easy to prepare and add a special flavor from Santa Fe to your holiday celebrations wherever you happen to live.
Santa Fe Biscochitos    makes about 60 two inch cookies
Traditionally biscochitos are made with lard which may be hard to find these days or, for various other considerations, you may prefer an alternative which I have included for this recipe. That said lard has been determined to probably be a healthier choice than hydrogenated vegetable oil (Crisco) and lard was after all what made your grandmother’s pie crusts so flavorful, light, and flaky. If using butter I would recommend using a European butter with a higher fat content for a lighter flaky result.
- 3 cups all purpose flourÂ
- 1 ½ teaspoons baking powder
- ½ teaspoon fine sea salt
- 2 teaspoons lightly toasted anise seeds, coarsely  ground
- 2 tablespoons orange zest
- 1 1/4  cups lard  or unsalted butter (or 3/4 cup vegetable shortening and ½ cup unsalted butter)
- 1 cup super fine sugar
- 1 large egg 1
- teaspoon pure vanilla extract
- 1 tablespoon brandy or anise liquor
Topping:
- ½ cup super fine sugar
- 2 teaspoons ground cinnamon
Mix the sugar and cinnamon together and set aside.
Sift the flour, baking powder, and salt into a bowl. Stir in the anise seeds and orange zest and set aside to use later.
Place the lard or butter (or vegetable shortening and butter) and sugar in the bowl of a stand mixer fitted with the paddle attachment. Beat together on medium high speed until the mixture is light and fluffy, about 5 minutes. Whisk the egg and add it to the bowl along with the vanilla and brandy (or anise liquor) and beat until completely combined. Reduce the speed to low and add the flour mixture in two additions and mix until the dough clumps together without over mixing. The dough will be a little softer than pie dough would be.
Remove the dough from the mixer bowl and place it on a lightly floured work surface. Divide the dough into two equal portions and gently form each portion into ball and then gently flatten the balls into discs about 1 ½ inches thick. Wrap each disc in plastic film and refrigerate for at least 2 hours until firm.
Line 2 cookie sheets with cooking parchment and have 2 cooling racks set aside.
Preheat the oven to 350f/180c
Working with one disc of dough at a time, roll the dough out gently on the floured work surface to about ¼ inch thick. Using 2 inch cookie cutters, cut the cookies out and place them on the lined cookie sheet with a little space between each cookie. When the sheet is full sprinkle the cookies with the cinnamon sugar topping. Transfer the tray of cookies to the refrigerator to chill.
Repeat the same process for the second and third tray of cookies.
Remove the first tray of cookies from the refrigerator and place them in the oven. Put the second tray of prepared cookies in the refrigerator while the first batch of cookies is baking.
Bake the cookies for 8 to 10 minutes max. The cookies should be light in color. Do not over bake!
Promptly transfer the cookies from the oven to a cooling rack. Let the cookies rest on the tray for a minute or so and then slide the parchment with the cookies onto the cooling rack.
Again repeat the same process for baking the second and third trays of cookies.
Storage: Be sure the cookies are completely cool before storing them!
A cookie tin with a tight fitting lid is ideal for storage. Fill the tin gently and place plastic film over the top of the rim of the tin and place the lid on firmly to make the tin airtight. The biscochitos will remain fresh for at least 7 to 10 days at room temperature. They can also be frozen in the tin.
Buen provecho!

Pennsylvania Dutch Apple Butter
Apple butter is essentially a slow cooked apple sauce with a few spices thrown in. As the applesauce cooks the sugar from the apples caramelizes and reduces into a thick deep amber “butter.†Traditionally spread on breads in place of butter, thus the name apple “butter.”
Apple butter is a household staple where I grew up in Pennsylvania Dutch (Deuitch) country although its origins are rooted in Europe. In Germany it is called Apfel Kraut, and in the Netherlands Appel Stroop.
Apple butter recipes came to America with German speaking Lutherans, Reformed, and Anti-baptist religious groups from Germany, France, and Switzerland when they immigrated to the United states in late 17th century. The settlers chose Southeastern Pennsylvania for is rich soil that was suitable for the farming practices they used in Europe. Both Amish and Mennonite farm communities were established which exist, mostly unchanged, to this day. Not only did these settlers introduce their sustainable farming methods in Pennsylvania, but also their hearty Pennsylvania Dutch cooking!

Apple Pie with Apple Butter
Apple butter is actually very easy to make and has endless applications beyond being spread on bread which is irresistibly good by the way. It is also a heady addition to pies, pastries, slow roasted meats, BBQ sauces, salad dressings, or served along with farm made cheeses. Try adding apple butter tossed in with your apples the next time you’re baking an apple pie. The results are transformative!
Traditionally apple butter is “put up†in the fall on Pennsylvania Dutch farms to last until the next apple harvest. Likewise, this is one pantry staple you will find you will want to have on hand year round, I promise.
Pennsylvania Dutch Apple Butter  Â
Makes about 3 cups
- 2 lbs./1 kilo firm crisp juicy apples
- 2 cups/500ml apple cider or apple juice
- 1 cup firmly packed light brown sugar
- ½ teaspoon flaked sea salt
- 2 tablespoons fresh lemon juice
- 1 teaspoon Saigon cinnamon (or other variety) Â Note: about Saigon Cinnamon (click here)
- ¼ teaspoon ground cloves
Peel, core, quarter, and chop the apples and place them in a nonreactive oven proof braising pan. Add the cider (or apple juice), the brown sugar, and salt and stir to combine. Place over medium heat on the stove top and when simmering partially cover the pan and continue to simmer, stirring occasionally, until the apples are very soft, about 30 minutes.
Preheat the oven to 250f/130c
Remove the pan from the stove and allow to cool for a few minutes. Then blend the apples along with the liquid using a hand held immersion blender, or transfer the apples and liquid to a blender, and blend until the mixture is completely smooth with the consistency of apple sauce.
Stir in the lemon juice, cinnamon, and cloves until combined and transfer the pan to the oven, uncovered, and bake for several hours, stirring every 30 minutes. The mixture will slowly turn an amber color as the sugar caramelizes and the liquid reduces. I’ve found it generally takes about 3 hours, but every oven is different, so keep an eye on it until apple butter reaches a deep amber color with a thick spreadable consistency.
Remove the pan from the oven and set on a wire rack to cool to room temperature.
For storage: Sterilize a couple of jars along with their lids with boiling water. Spoon the apple butter into the jars, seal tightly, and refrigerate for up to about a month.
For longer storage follow standard hot water bath canning procedures and when sealed and cooled to room temperature, store in a dark place in your pantry for up to a year.

Saigon Cinnamon Sables
I have never been a great fan of cinnamon, that is until I discovered Saigon cinnamon!
It is Saigon cinnamon’s spicy sweet flavor and intoxicating aroma that sets it apart from all other cinnamon varieties and considered the finest cinnamon  in the world. If you have ever found yourself lingered over a steaming bowl of Vietnamese Pho it is the faint aroma of Saigon cinnamon that teases your appetite into utter submission.
Vietnamese cassia trees, a South East Asian evergreen, are mostly grown in the central highland province of Quang Ngai. The bark is stripped from the trees, dried, bundled or finely ground, and sent to Saigon for export. Thus, the name Saigon cinnamon. The Vietnamese cassia bark has the highest essential oil content of any cinnamon and gives Saigon cinnamon such a unique flavor and aroma. Available at specialty spice shops and online vendors.
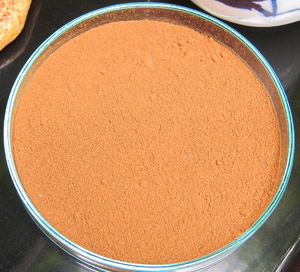
Saigon Cinnamon
Saigon Cinnamon Sables?
Some friends recently brought back a nice cache of Saigon cinnamon for me from Hanoi. Hanoi is the Paris of Vietnam if you will, and I was drawn to the idea of using the cinnamon in sables, which are in keeping with the French influences left behind in Vietnam following the French Indochine era. Sables are a classic French shortbread biscuit with a light crumbly texture of sand. It just seemed like a perfect fit. A light buttery spiced biscuit with a hint of salt and the aroma of Saigon cinnamon… et voila!
Saigon Cinnamon Sables  Makes about 36 (2 ½ inch) sables
I prefer mixing the ingredients for this recipe the old fashioned way, by hand. The secret to success here is to not overwork the dough, which will then produce a light airy sable.
- 5.5 ounces (150 grams) best quality salted butter (at room temperature)
- 1 teaspoon flaked sea salt (Maldon)
- 2/3 cup fine natural sugar (or white)
- 1/3 cup confectioners sugar (measured after sifting)
- 3 large organic egg yolks
- 1 teaspoon pure vanilla extract
- 2 cups all purpose flour
- 2 teaspoons baking powder
- 4 teaspoons fine ground Saigon cinnamon
- 1 egg yolk
- 1 teaspoon water
- cinnamon sugar for sprinkling
Place the room temperature butter and salt in a mixing bowl and cream the butter using a silicone spoon until smooth, about 1 minute.
In a separate bowl beat 3 egg yolks until light and fluffy. Then gradually add the sugars while beating until the mixture is smooth and velvety. Add the vanilla and beat until incorporated.
Add the egg/sugar mixture to the creamed butter and beat until incorporated, about 1 minute.
Using a separate bowl sift together the flour, baking powder, and cinnamon and stir until evenly combined. Then add the flour mixture to the butter mixture all at once. Begin folding the flour into the butter mixture until the flour is absorbed into the butter and the mixture looks like a coarse meal, or damp sand if you will. You want the dough to be loose rather than clumping together. The less you work the dough the better.
Line a baking tray with cling film and transfer half the dough onto the cling film lengthwise, evenly mounding the dough down the center of the cling film to about 9 inches in length. Then fold the cling film nearest you over the dough and gently roll the dough into a log shape without overly compressing the dough until it is completely encased in the cling film. The log should be roughly 2 inches in diameter. Gently twist both ends of the cling film to completely seal the dough. The dough can then be refrigerated for up to 5 days or frozen for later use.
Repeat this process for the remaining dough and refrigerate both logs of dough for at least 1 hour before you intend to bake the sables.
Baking: Prepare 3 baking trays lined with parchment.
Clear space in your fridge for chilling the baking trays of sables before they are baked.
Preheat oven to 350f/180c Best to use an oven thermometer to insure the oven is heated to the right temperature before baking each tray of sables.
Remove one of the logs from the fridge and gently adjust the shape of the log so it is as round as possible, without using too much pressure as you do not want to overly compress the dough!
Open the cling film and, using a very sharp knife, slice the dough into 1/3 to ½ inch rounds and place them 1 inch apart on a parchment lined baking tray; about 12 to a tray. Return the remaining dough to the fridge.
Whisk the remaining egg yolk with a teaspoon of water. Using a pastry brush, glaze the top of each slice of dough. Sprinkle the top of each with cinnamon sugar and return the tray to the fridge to chill for ten minutes before baking.
Then transfer the tray to the oven. Total cooking time will vary slightly, but about 14 to 16 minutes total, turning the tray midway through the baking for even coloring.
What to expect: The sables will spread within the first couple of minutes and then begin to rise. When fully baked the bottoms should be golden color, the edges very slightly colored, and the tops pale. Timing is everything with sables so bake on the side of caution, checking the first batch frequently to be sure you don’t over bake these delicate delights. You can then bake the remaining batches with confidence.Â
While the first batch is baking you can prepare the next batch and place them in the fridge until you are ready to bake.
Once the sables are perfectly baked remove the tray from the oven and set aside to rest for a minute and then slide the parchment with the sables onto a cooling rack.
Before baking the next batch be sure that the oven returns to 350f/180c.
Once all the sables are baked and are completely cool you can place them in a cookie tin. With the tin filled, drape a sheet of cling film over the top and press the lid on tightly. This will insure that the sables will remain fresh for up to 5 days stored at room temperature.
Sables are a perfect match served with tea or coffee, or with ice cream!
Adding Saigon cinnamon to French pressed coffee is another favorite. Just add a half teaspoon of Saigon cinnamon and a pinch of sea salt to ground coffee. Add boiled water and allow to rest for several minutes before pressing and serving.

Baked Figs
A perfectly ripened fig plucked from the tree at just the right moment is the ultimate luxury of summer’s soft sweet and succulent bounty.
The fig’s western Asian origins have been documented as far back as 4000 years. Fig cultivation eventually spread throughout the Mediterranean and later to central and north America. Turkey is the largest producer of figs in the world and California the largest in the Americas. The most common varieties available are the Black Mission, Brown Turkey, and Green Kadota. Figs are one of the healthiest foods you will ever eat. High in potassium, manganese, vitamin B6, calcium, phosphorus, iron, and dietary fiber.
The first season of figs is ready for picking in late spring/early summer and the second season late summer/early fall. Fresh figs are very fragile and do not ship well, so unless you have your own tree in the garden or have access to a local farmers offerings you are going to have to settle for figs that are picked before they ripen for shipping. The problem is once figs are picked the ripening process stops.
Thankfully there is a solution! A short bake in a hot oven essentially finishes the ripening process, bringing out all the sweet fleshiness as if the figs were ripened on the tree.
Serve them before a meal with smoked meats or cheeses, with a meal of roasted or grilled meats or poultry, or following a meal with a small dollop of Greek yoghurt or whipped cream. To me, this is one of the simplest and most elegant desserts you will ever serve!
Baked Figs  serves 4
- 8 fresh figs
- light olive oil for brushing
- orange zest in syrup (optional)
- Â Greek yoghurt or whipped cream for finishing
Line a baking tray with parchment paper and set aside.
Preheat the oven to 400F/205C Â Â Set the oven rack in the middle of the oven.
Rinse the figs and gently pat dry. Slice the figs in half lengthwise, including the stem if attached, exposing the gorgeous rose colored flesh and amber hued edible seeds.
Place the halved figs in the baking tray cut side facing up. Lightly brush with the oil and place in the oven for 20 minutes. The figs will puff up slightly and you will see rose color juices bubbling over onto the parchment liner in the tray.
Serve either warm from the oven or chill to serve later.
Place 4 baked fig halves on 4 individual dessert plates. Pour the fig juices in the baking tray over the figs. Top lightly with orange zest in syrup (optional) and a small dollop of Greek yoghurt  or whipped cream in the center of the plate and serve.
Orange zest in syrup:
- zest of 1 orange, very finely minced
- 1/3 cup sugar
- 1/3 cup water
Rinse the orange under hot water to remove any wax that may be coating the skin. Pat dry.
Using a vegetable peeler, peel away long strips of zest from stem to stern. Be sure there isn’t any white pith on the underside of the zest. Slice the zest strips lengthwise as thin as you possibly can. Bundle the strips together and slice across the strips as thin as you possibly can, turning out a very fine minced zest.
Transfer the zest to a small sauce pan and add the sugar and water. Bring to a boil and reduce heat slightly until the mixture is bubbling evenly. Reduce the liquid, swirling the pan from time to time, until the mixture has the consistency of syrup. Remove from heat promptly and set aside to cool.
Spoon the zest in syrup lightly over each fig and serve.