Pasta
Thai…americano Pesto
I used to make some stellar Thai basil pesto variations when I was living in in Thailand. But Thai basil is hard to find here in the US unless you’re lucky enough to have an Asian grocery store near by.
By all means use Thai basil if it is available for the recipe that follows. There are two varieties to look for. Thai sweet basil has pointed bright green aromatic leaves with a hint of anise and an after note e of cinnamon. Thai holly basil leaves are a deep green or sometimes reddish purple leaves with an earthy peppery flavor. Both variegates are distinctly more assertive in flavor than broad leaf Italian basil.
If Thai basil is not available, just adapt and diversify, which is how this recipe evolved. The secret to Thai food’s popularity is a cleaver one. Most Thai dishes include all five elements of taste, those being salty, sweet, sour, bitter, and umami (savory) flavors in one dish which is pure genius. It’s no wonder why Thai food is so loved. With that concept in mind I used readily available broad leaf Italian basil along with some hot jalapenos from south of the border, some Thai fish sauce, lime juice, cashews (abundant in Thailand) and you end up with a Thai- americano pesto!
This is a pesto you will want to add to your repertoire. A dollop added to almost any savory dish will have it bursting with all the flavors of a Thai- americano mash up.
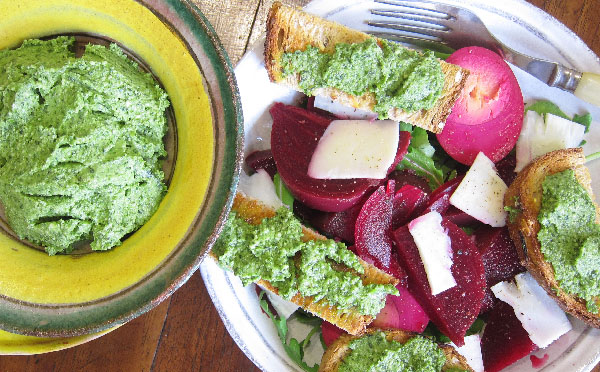
Pictured is Thai..americano Peato served on toasted bread strips atop a salad of baby arugula, pickled beets and hard cooked eggs, and shaved aged provolone cheese.

Thai…americano  Pesto          Makes about 1 ½ cups
- 3 cups fresh torn broad leaf Italian basil leaves, or Thai basil if available
- 2 tablespoon minced garlic
- 3 to 4 tablespoons freshly squeezed lime juice
- 1 or 2 jalapeno chiles, seeded and diced
- ½ cup chopped cashews
- ¾ teaspoon sea salt + more to taste
- 1 tablespoon fish sauce +more to taste
- ¼ teaspoon sugar
- ¼ cup olive oil
- cold water as needed for thinning
Place the basil leaves, garlic, 3 tablespoons lime juice, jalapeno chiles, cashews, ¾ teaspoon of salt, fish sauce, and sugar in the work bowl of a food processor. Pulse until the ingredients are broken down into a coarse paste.
Scrape down the sides of the work bowl. Turn the machine on and pour the olive oil into the feed tube and continue to run the machine until all the oil is incorporated.
Stop the machine and taste the pesto and add additional salt and fish sauce to taste. If the pesto needs thinning, turn the machine on and add 1 tablespoon of cold water at a time until you reach the desired consistency.
Transfer the pesto to a nonreactive container, cover, and refrigerate.
Serving
The pesto can be served chilled or at room temperature with endless applications.
Listed are additional pesto recipes that I have posted over the years to to expand your pesto repertoire for freezing for later use during the winter months.
Fresh Sweet Italian Basil Pesto (see here)
Pesto alla Siciliana & Pesto Trapanese (see here)
Spinach Pesto with Pancetta (see here)
Pomegranate Glazed Pork Loin with Pistachio Pesto (see here)
Pesto Diverso (see here)

Meatballs….perfect (Basics)
Just a mention of meatballs and spaghetti is probably going to conjure up a flashback to one of those cafeteria lunch offerings we would all rather forget from our childhood. And of course most of us didn’t have an Italian Nona to cook for us, so we were left with the next best option, the ubiquitous Italian American restaurant versions of meatballs and spaghetti which were just often delicious enough to keep us coming back.Â
Fortunately, the true glories of meatballs have surfaced in nearly every culture and cuisine throughout the ages. From China’s Qin Dynasty, the Romans, the Persians, and of course the modern day Italian’s cuisine we are all familiar with today.
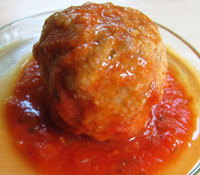
The recipe that follows does not stray far from the wisdom of the Italian Nona. My one exception is making the meatballs larger than the smaller traditional Italian “polpettesâ€. I much prefer the tender juiciness of these meatballs that are slowly simmered in a simple traditional “passata†tomato sauce. Serve them as they are or with pasta along with a beautiful crisp salad and you have a perfect pairing for simple meal for any season.
Meatballs (Basics)
Meatballs…(Basics)   makes twelve 2 ½ oz meatballs
- 1 pound/ 455 g best quality ground beef
- 1 pound/ 455 g lean ground porkÂ
- 2 thin slices pancetta, minced
- ½ cup dry breadcrumbs
- 3 tablespoons whole milk
- 1 ½ cups grated Parmigiano-Regiano
- 1 small onion, minced (about ¾ cup)
- 2 small garlic cloves, minced (about 1 tablespoon)
- ½ cup finely chopped Italian parsley leaves
- 1 extra large organic egg, whisked
- ¾ teaspoon freshly ground black pepper
- 1 teaspoon red pepper flakes (or more to taste)
- 1 ½ teaspoons flaked sea salt + more to taste
- 1 cup flour
- ¼ cup extra virgin olive oil
- Passata tomato sauce
- 3 bay leaves
In a large mixing bowl combine the ground beef, ground pork, and minced pancetta. Toss with your hands until well combined and set aside.
In a small mixing bowl combine the bread crumbs and milk. Set aside for 5 minutes and then squeeze out the excess milk.
In a medium bowl combine the milk soaked bread crumbs, 1 cup grated Parmegiano-Reggiano, minced onion, minced garlic, chopped parsley, whisked egg, ground pepper, pepper flakes, and sea salt. Toss the ingredients together until well combined. Then scatter the mixture over the ground meats and pancetta.
Using your hands, toss all the ingredients together until they are completely combined. Cover the mixture with cling film and refrigerate for 1 hour.
Once the chilled meatball mixture has firmed up, remove from the fridge, and weigh out 12 2 oz portions. Roll each portion gently between the palms of your hands until uniformly rounded. Do not over compress the mixture as you roll the meatballs. The less densely compacted they are the more tender and juicy they will be when cooked.
Gently roll each meatball in the flour until evenly coated. Shake off excess flour and place the meatballs on a tray. Cover the filled tray with cling film and refrigerate for 30 minutes. This will firm up the meatballs so they retain their shape while browning them.
Preheat the oven to 350 F/ 180 C
Remove the chilled meatballs from the fridge. Place the olive oil in a wide shallow braising pan or oven proof skillet set over medium heat. When the oil is nearly smoking add half of the meatballs to the pan and cook them until evenly browned on all sides. When done remove the meatballs and set them aside on a platter while you brown the remaining meatballs.
Once all the meatballs are browned, pour most of the oil out of the pan and remove any remaining bits left in the pan using a paper towel. The pan should look fairly clean. Add a bit more fresh oil if necessary.
Return the browned meatballs to the braising pan and pour the preheated “passata†tomato sauce into the pan until it nearly covers the meatballs leaving just the tops exposed. Tuck the bay leaves into the sauce and transfer the pan to the oven. The braising can also be done on the stove top if an oven is not an option.
After 30 minutes open the oven door, turn the pan, and add more sauce if needed. Return the pan to the oven for another 30 minutes. When finished the sauce should have thickened somewhat and the tops of the meatballs nicely glazed.
If you are serving the meatballs on a bed of pasta as pictured, have the pasta cooked al dente and ready for serving as soon as the meatballs come out of the oven.
Serving: Place the pasta on individual plates and top with 3 meatballs per serving. Spoon sauce over the pasta and a little over the meatballs. Top each meatball with the remaining grated Parmegiano-Reggiano and serve.
“Passata†Tomato Sauce:
- 2Â 24 oz bottles or cartons of Italian passata tomato sauce (Mutti brand is very good)
- 2 tablespoons extra virgin olive oil
- 1 ½ to 2 teaspoons sea salt
- freshly ground black pepper
- a pinch of sugar
- ½ teaspoon ground red chile (optional)
- chicken stock as needed
“Passata†describes a process where vine ripe Roma tomatoes are passed through a food mill and then cooked. The process removes the seeds and skin from the tomatoes and once cooked makes a simple tomato sauce with just a few added ingredients.
I highly recommend using imported passata. There are several brands available. Mutti is my favorite and makes a beautiful sauce bursting with flavor.
Place a large saucepan over medium heat. Add the olive oil and when nearly smoking pour in the passata and stir. Once the sauce comes back to a boil lower the heat to a simmer. Stir in the salt, black pepper, sugar, and chile powder if using. Cook for 30 minutes, stirring from time to time. Add hot chicken stock if the sauce needs thinning.
Keep the sauce warm on the stove top to add to the meatballs for braising or for saucing pasta before serving.
You will most likely have left over sauce which you can freeze for later use.

Andalusian Pisto with Pasta
I just love Spanish food and was recently watching Rick Stein’s Long Weekends; Cadiz (BBC TWO 2016). Cadiz, in western Andalusia, is a part of Spain I have not visited. I understand it is a little more difficult to get to so not inundated with tourists like the Mediterranean coast of Spain. The old city’s whitewashed buildings shimmer and the food and wines beckon. This is a cook’s dream and definitely on my list of must visits.
Andalusia is the southern most autonomous community of Spain. It lies south of the Iberian peninsula with a coastline fronting both the Atlantic ocean and Mediterranean Sea. With Morocco just to the south, it is often refereed to as the gateway to Africa. Ancient Andalusian ports were established by the Phoenicians. They were later occupied by the Romans, and then ruled by the Moors for more than 800 years. Christopher Columbus sailed from the Andalusian port of Cadiz for his second voyage to the Americas in 1493 and returned to the Andalusian port of Sanlucar de Barrameda. Today Andalusia is not only famous for its rich cultural past, but for its spectacular seafood, its superb sherry production and of course…Flamenco! This is Spain!
Duly inspired, I just had to get into the kitchen and cook up something that brought some of the flavors of this region of Spain to life. Spanish food is remarkably direct, full of earthy flavors, and is as colorful and alive as the Spanish themselves. The next best thing to taking a trip to Cadiz!
Pisto is a more robust Spanish version of the French ratatouille, which always includes eggplant, tomatoes, and peppers.For this recipe I have introduced the smoky flavor of Spanish red picante pimenton. I have also added meats, including pork, serrano ham, and Spanish chorizo if you like. Pisto is usually served as it is, but to my mind this pisto, or ragu if you like, makes a very robust and flavorsome sauce for pasta. A flourish of grated Monchego cheese finishes this pasta perfectly.
…or Serve as a tapa at room temperature with shaved Monchego.

Andalusian Pisto Tapa
Andalusian Pisto with Pasta    Serves 4 to 6
- 3 tablespoons Spanish olive oil
- 375 g/ 13 oz ground pork
- 1 large onion, peeled and diced
- 5 garlic cloves, peeled and minced
- 1 green bell pepper, trimmed, seeded, and finely diced
- 150 g/5 ½ oz thinly sliced dry cured Serrano ham, cut into small pieces
- 1 large (or 2 small) eggplant, unpeeled, diced into ½ inch cubes
- 1 teaspoon toasted cumin seeds, ground
- ½ teaspoon toasted coriander seeds, ground
- 1 teaspoon dried marjoram leaves, crumbled
- 500 g/18 oz crushed tomatoes
- 1 to 1 ½ tablespoons picante smoked Spanish paprika (El Avon or La Chinata brands)
- sea salt
- freshly ground black pepper
- water as needed to thin sauce
- 3 tablespoons dry Spanish sherry
- 50 g/1 ¾ oz thinly sliced Spanish Chorizo, halved (optional)
- 3 tablespoons thinly sliced broad leaf parsley
- Manchego cheese (curado 6 months) for grating
- pasta of choice, cooked al dente
Heat a large skillet medium high heat. Add the olive oil and when it begins to smoke add the ground pork and cook until the pork begins to brown. Lower the heat to medium and using a slotted spoon transfer the pork to a bowl and set aside.
Promptly add the onions to the skillet and saute until they are soft, about 5 minutes. Add the garlic and saute another minute. Then add the sliced peppers and the serrano ham and saute until the peppers are softened. Stir in the reserved browned ground pork until the ingredients are well combined,
Add the eggplant to the skillet and season with the cumin, coriander, and marjoram. Continue sauteing until the eggplant is slightly colored and softened.
Add the crushed tomatoes and bring the contents of the pan to a simmer. Season with Spanish paprika, salt, and ground pepper. Lower the heat to a gentle simmer. After about 15 minutes stir in the sherry and continue cooking another 10 minute or so. Add the chorizo if using and cook until the sauce is the right consistency, adding water to thin the sauce if needed .
While the pisto is simmering heat a large pot of water and bring to a rolling boil. Add salt and the pasta and stir from time to time until the pasta is cooked al dente.
Taste the sauce and correct the seasoning to your liking.
When you are ready to serve drain the pasta and place it back into the pot and stir in some of the pisto to evenly coat the pasta. Transfer the pasta to individual pasta plates. Top the pasta with more pisto and scatter the parsley over each serving. Add a good grating of Manchego over each portion and serve.

Braised Zucchini with Pasta
There are many ways to cook zucchini, but for me simply braising is by far the best way to bring zucchini’s delicate flavor to full bloom. Once braised there are so many quick and easy applications awaiting.
Zucchini, in the squash family, is native to the Americas. However the zucchini we are now familiar with is a hybrid that was developed in Italy in the 19th century and named zucchini, the diminutive of zucca. Colors range from pale to deep green as well as light yellow to a deep orange. Zucchini is usually harvested while still young, about 6 to eight inches in length, with seeds that are still soft and tender. Left to grow zucchini can reach up to a meter in length.
Anyone who has grown zucchini knows full well it is the garden’s star over achiever. The harvest can be continuous and down right overwhelming, as are the challenges for the cook who is faced with “oh no, not zucchini again.â€
More often than not zucchini is cooked into other dishes like a Provencal ratatouille which is splendid, but the zucchini’s real personality is somewhat lost in translation. Be that as it may, zucchini can really shine on its very own if cooked properly.
Using this simple braising method requires only a few ingredients and a well tended low heat braising on the stove top that slowly coaxes out a nuanced flavor of summer that could only come from zucchini.
Ounce braised the zucchini can then be used as a side dish, pureed for a soup that can be served chilled in the summer or warm as fall approaches, or as a sauce for pasta along with braised zucchini and poached chicken. This is a pasta sauce that has become one of my very favorites when cooking up a summery meal .
Braised Zucchini
- 2 ½ pounds 6 to 8 inch zucchini, trimmed
- 3 tablespoons olive oil
- 1 ½ cups finely diced onions
- 3 plump garlic cloves, peeled and minced
- ½ teaspoon dried marjoram
- 4 ½ cups chicken stock (or water), hot
- ½ cup cream
- 1 cup grated Parmigiano
- flaked sea salt and freshly ground white pepper to taste
Cut the trimmed zucchini into quarters lengthwise. Slice the quarters into ½ inch slices. Place in a bowl and set aside.
Place a wide heavy bottomed pan on the stove over medium low heat. Add the olive oil and when the oil slides easily in the pan add the onions and saute for 5 minutes, stirring from time to time.
Add the garlic and cook another 2 minutes while stirring.
Then add the sliced zucchini and fold them into the onion mixture. Reduce the heat to low and cook for 25 to 30 minutes. Stir frequently and be sure to lift the onions off the bottom of the pan so they do not burn.
Stir in the marjoram after about 15 minutes of cooking time and season sparingly with salt and pepper.

Braised Zucchini
After about 20 minutes you will have to stir more frequently, being sure to continuously lift the onions off the bottom of the pan. Once the zucchini is very soft, just barely colored, and looking slightly glazed remove the pan from the heat.
At this point, if you are intending to use the braised zucchini for a pasta remove about ¼ of the braised zucchini and set aside to use for the pasta later.
If you are intending to serve the braised zucchini as a side dish, add a little cream and a little hot stock and to the pan and stir to combine. Then add some grated Parmigiano, season with salt and pepper, and serve.

Braised Zucchini as a side dish.
Otherwise set the pan with the braised zucchini back onto the stove over medium heat. Add about two thirds of the hot stock (or water) and bring to a boil. Then lower the heat to a simmer and cook for about 20 to 30 minutes or until the liquid is reduced by half and the zucchini is very soft.
Remove from the heat, cool a few minutes. Then blend with an immersion blender (or transfer to a blender) and blend until smooth. If the puree seems very thick add a little more hot stock and blend.
Return the mixture to the heat and bring back up to a low simmer. Slowly stir in the cream until incorporated and then stir in the Parmigiano. Continue to stir 1 minute and then taste. Add additional salt and pepper if needed. Stir well and set aside.

Braised Zucchini Soup or Pasta Sauce
Cool the puree to room temperature if you are intending to use as a soup. Then cover and refrigerate. Serve chilled or warmed slightly.
If you are intending to use the puree as a pasta sauce you may want to reduce the sauce a little bit more.
Meanwhile divide the poached chicken into bite size strips and reheat with a little chicken stock or water.
Boil your pasta until cooked al dente and drain.
Add the reserved braised zucchini and the warmed chicken to the hot reduced sauce and stir. Then fold in the cooked pasta.
Transfer the pasta  to individual pasta bowls, spooning any remaining sauce over the pasta. Grate Parmigiano over the pasta and serve.